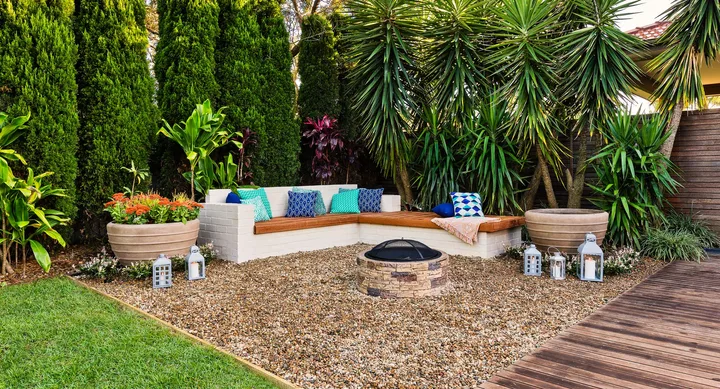
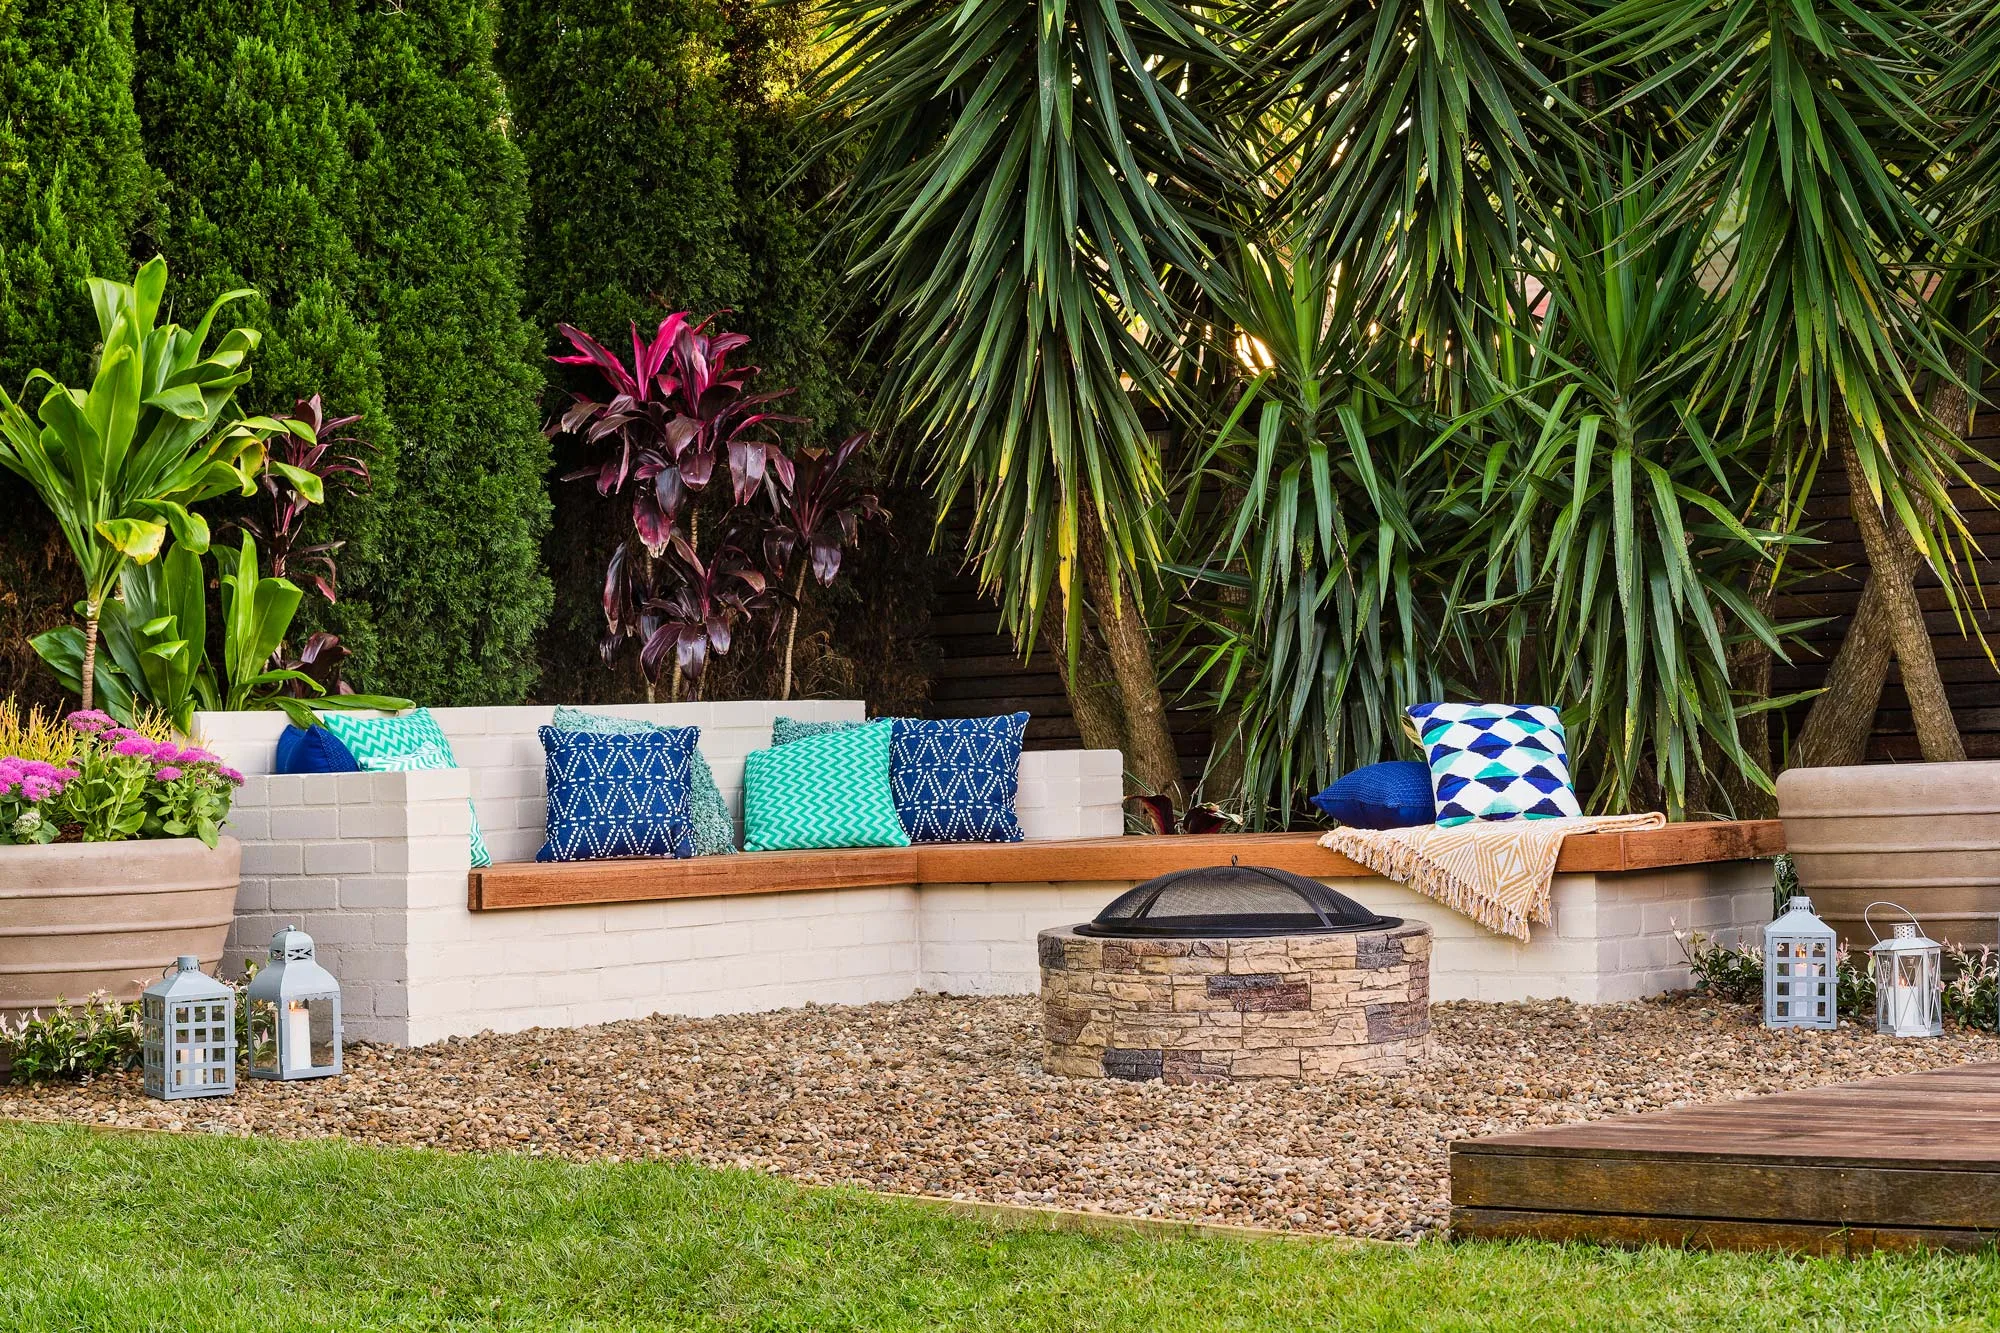
Most backyards have a forgotten corner. It’s usually a sunless patch where nothing much grows, so it doesn’t really get used.
This sensational brick bench is the perfect solution. Group it with a few plants, a small water feature and a store-bought fireplace (or DIY one) for an attractive entertainment area and you’ll create the busiest part of your garden. Building with bricks does require a bit of effort but, if done correctly, you’ll have a classy bench that will last a lifetime.
Gather your supplies
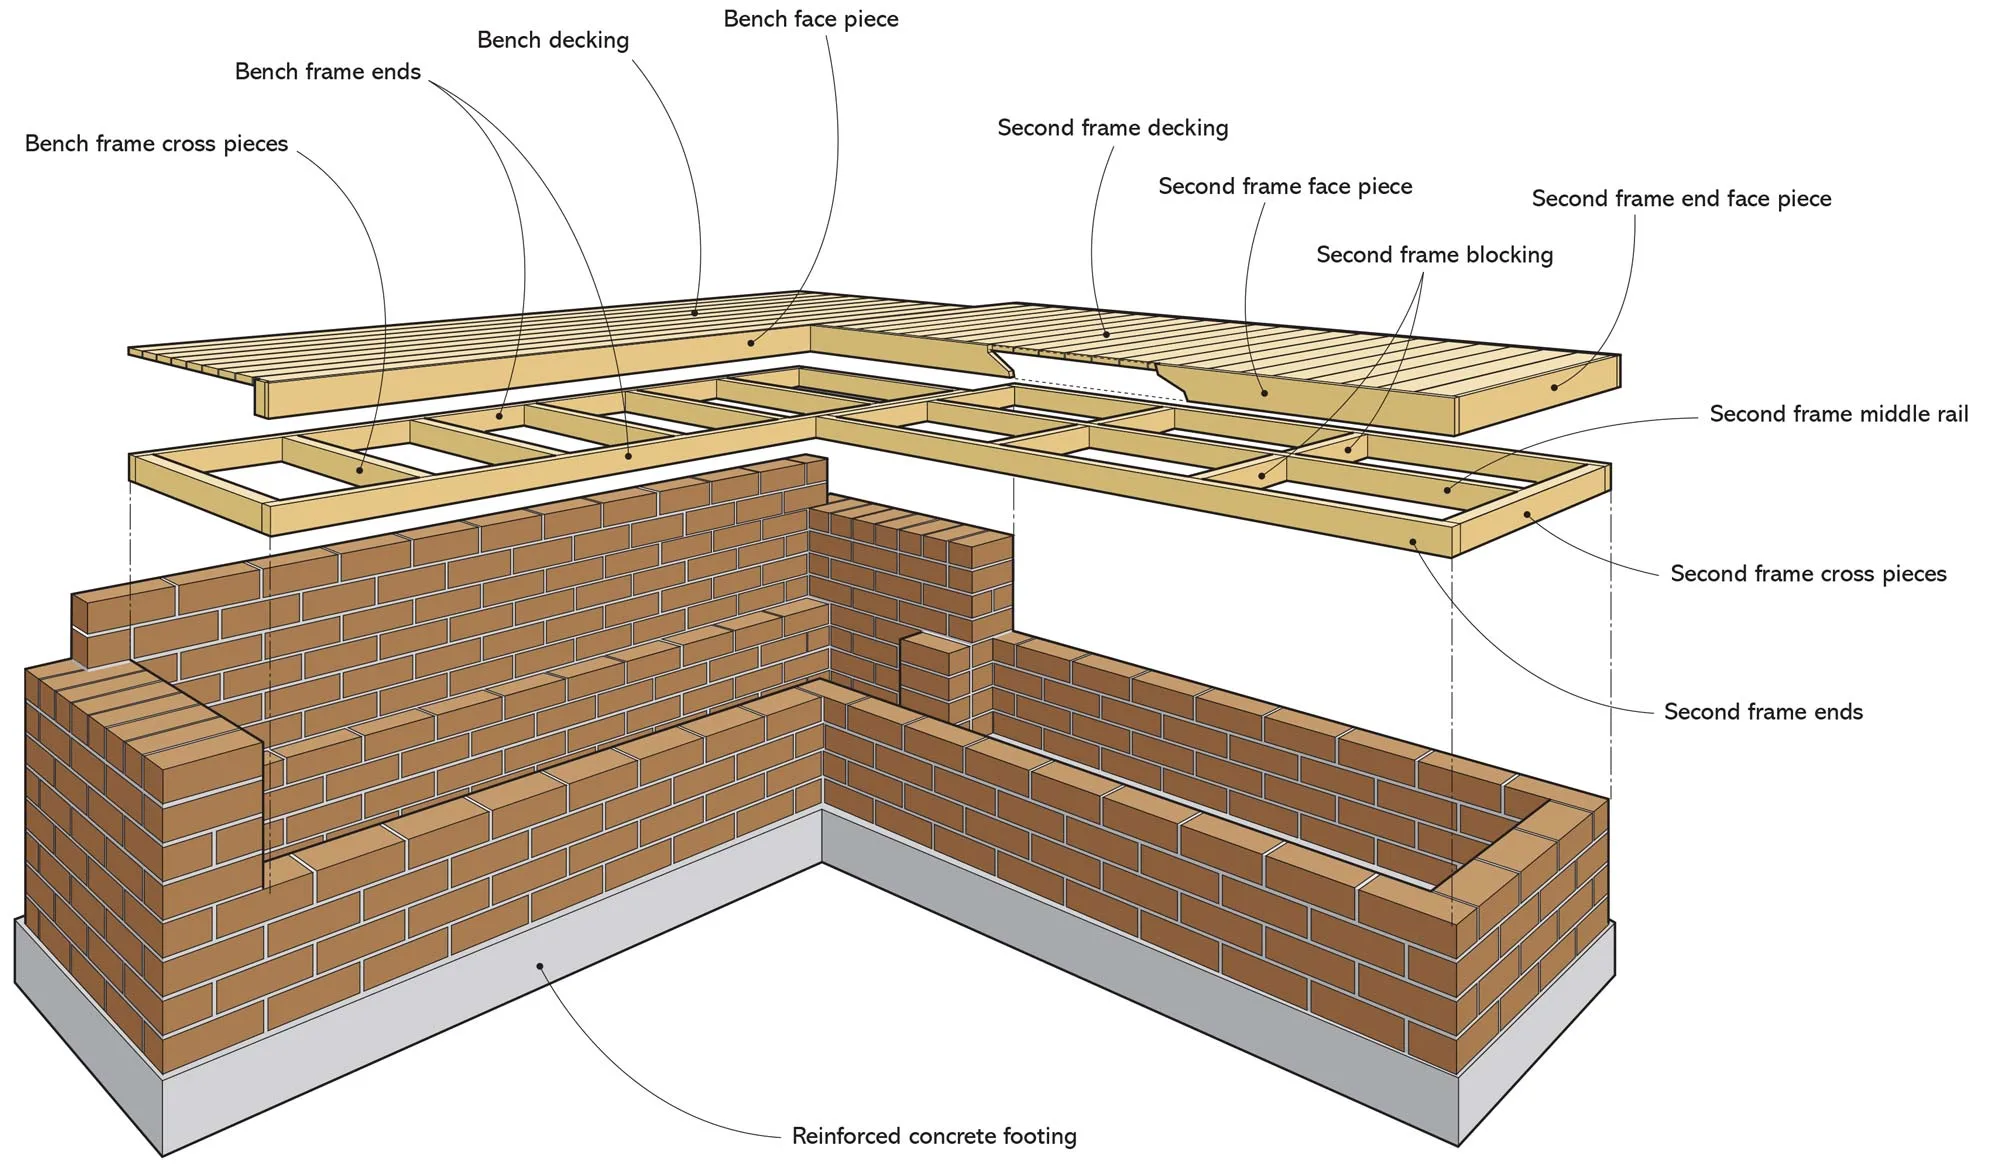
A Main bench long sides (2) 2540 x 70 x 45mm treated pine
B Main bench crosspieces (7) 770 x 70 x 45mm treated pine
C Second bench long sides (2) 2150 x 70 x 45mm treated pine
D Second bench crosspieces (2) 900 x 70 x 45mm treated pine
E Middle rail 2060 x 70 x 45mm treated pine
F Blocking (4) 427 x 70 x 45mm treated pine
G Main bench decking (9) 2540 x 90 x 19mm Merbau decking
H Second bench decking (24) 990 x 90 x 19mm Merbau decking
I Main bench facing 2030 x 90 x 19mm Merbau decking
J Second bench facing (2) 2170 x 90 x 19mm Merbau decking
K Second bench end facing 990 x 90 x 19mm Merbau decking
Notes
1. A standard brick is usually 230mm (L) x 110mm (W) x 76mm (H). When planning a brick structure, try to make its dimension to the nearest full brick (including mortar joints), if possible. That way there will be less cutting to do and your finished product will look neater.
2. Check all the timber components against actual unit as it is being built before cutting to size.
You’ll also need
Stringline; wooden pegs; set-out paint; bolt cutters or angle grinder; reinforcing mesh sheet; cable ties; bolster and mallet; 1m3 pre-mixed concrete; dry-pressed bricks (500, see Notes, left); screed; spirit level; square; wooden float; pointed trowel; cement mixer (hired, optional); wheelbarrow; cement (4 bags); yellow brickie’s sand (0.5 tonne); lime (1 bag); road base (1 tonne); small river pebbles (1 tonne); bricklayer’s line pins; 100mm bugle-head screws; cordless drill; nail gun and nails; H4 timber garden edging; plate compactor (hired); Dulux Weathershield Low Sheen in Warm Neutral; Cabot’s Aquadeck natural decking oil.
Here’s how
Step 1
Measure dimensions of bench (here, an L-shape measuring 3100mm on each side with 960mm-wide seats) and mark each corner with wooden pegs. Run stringline between pegs and, using set-out paint, mark outline of bench. Remove turf and excavate to a depth of 150mm.
Step 2
Using bolt cutters or angle grinder, cut reinforcing mesh to sit inside hole, leaving a gap of 50mm to sides. Put a number of half-bricks in hole and sit mesh on top (this is so concrete can get underneath). Using cable ties, hold mesh together where pieces overlap.
Step 3
Pour concrete into hole, spreading it around steel and using a rod to stamp it in and remove air bubbles. Using screed and spirit level, create a level area about 250mm wide around perimeter, then smooth off using wooden float. Leave concrete to cure for a few days. Remove turf and top layer of soil of desired pebbled area.

Step 4
Set out your walls by laying out bricks. Using screed and square, ensure walls are square and straight at corners. Using a pencil, mark outside line of bricks on concrete.
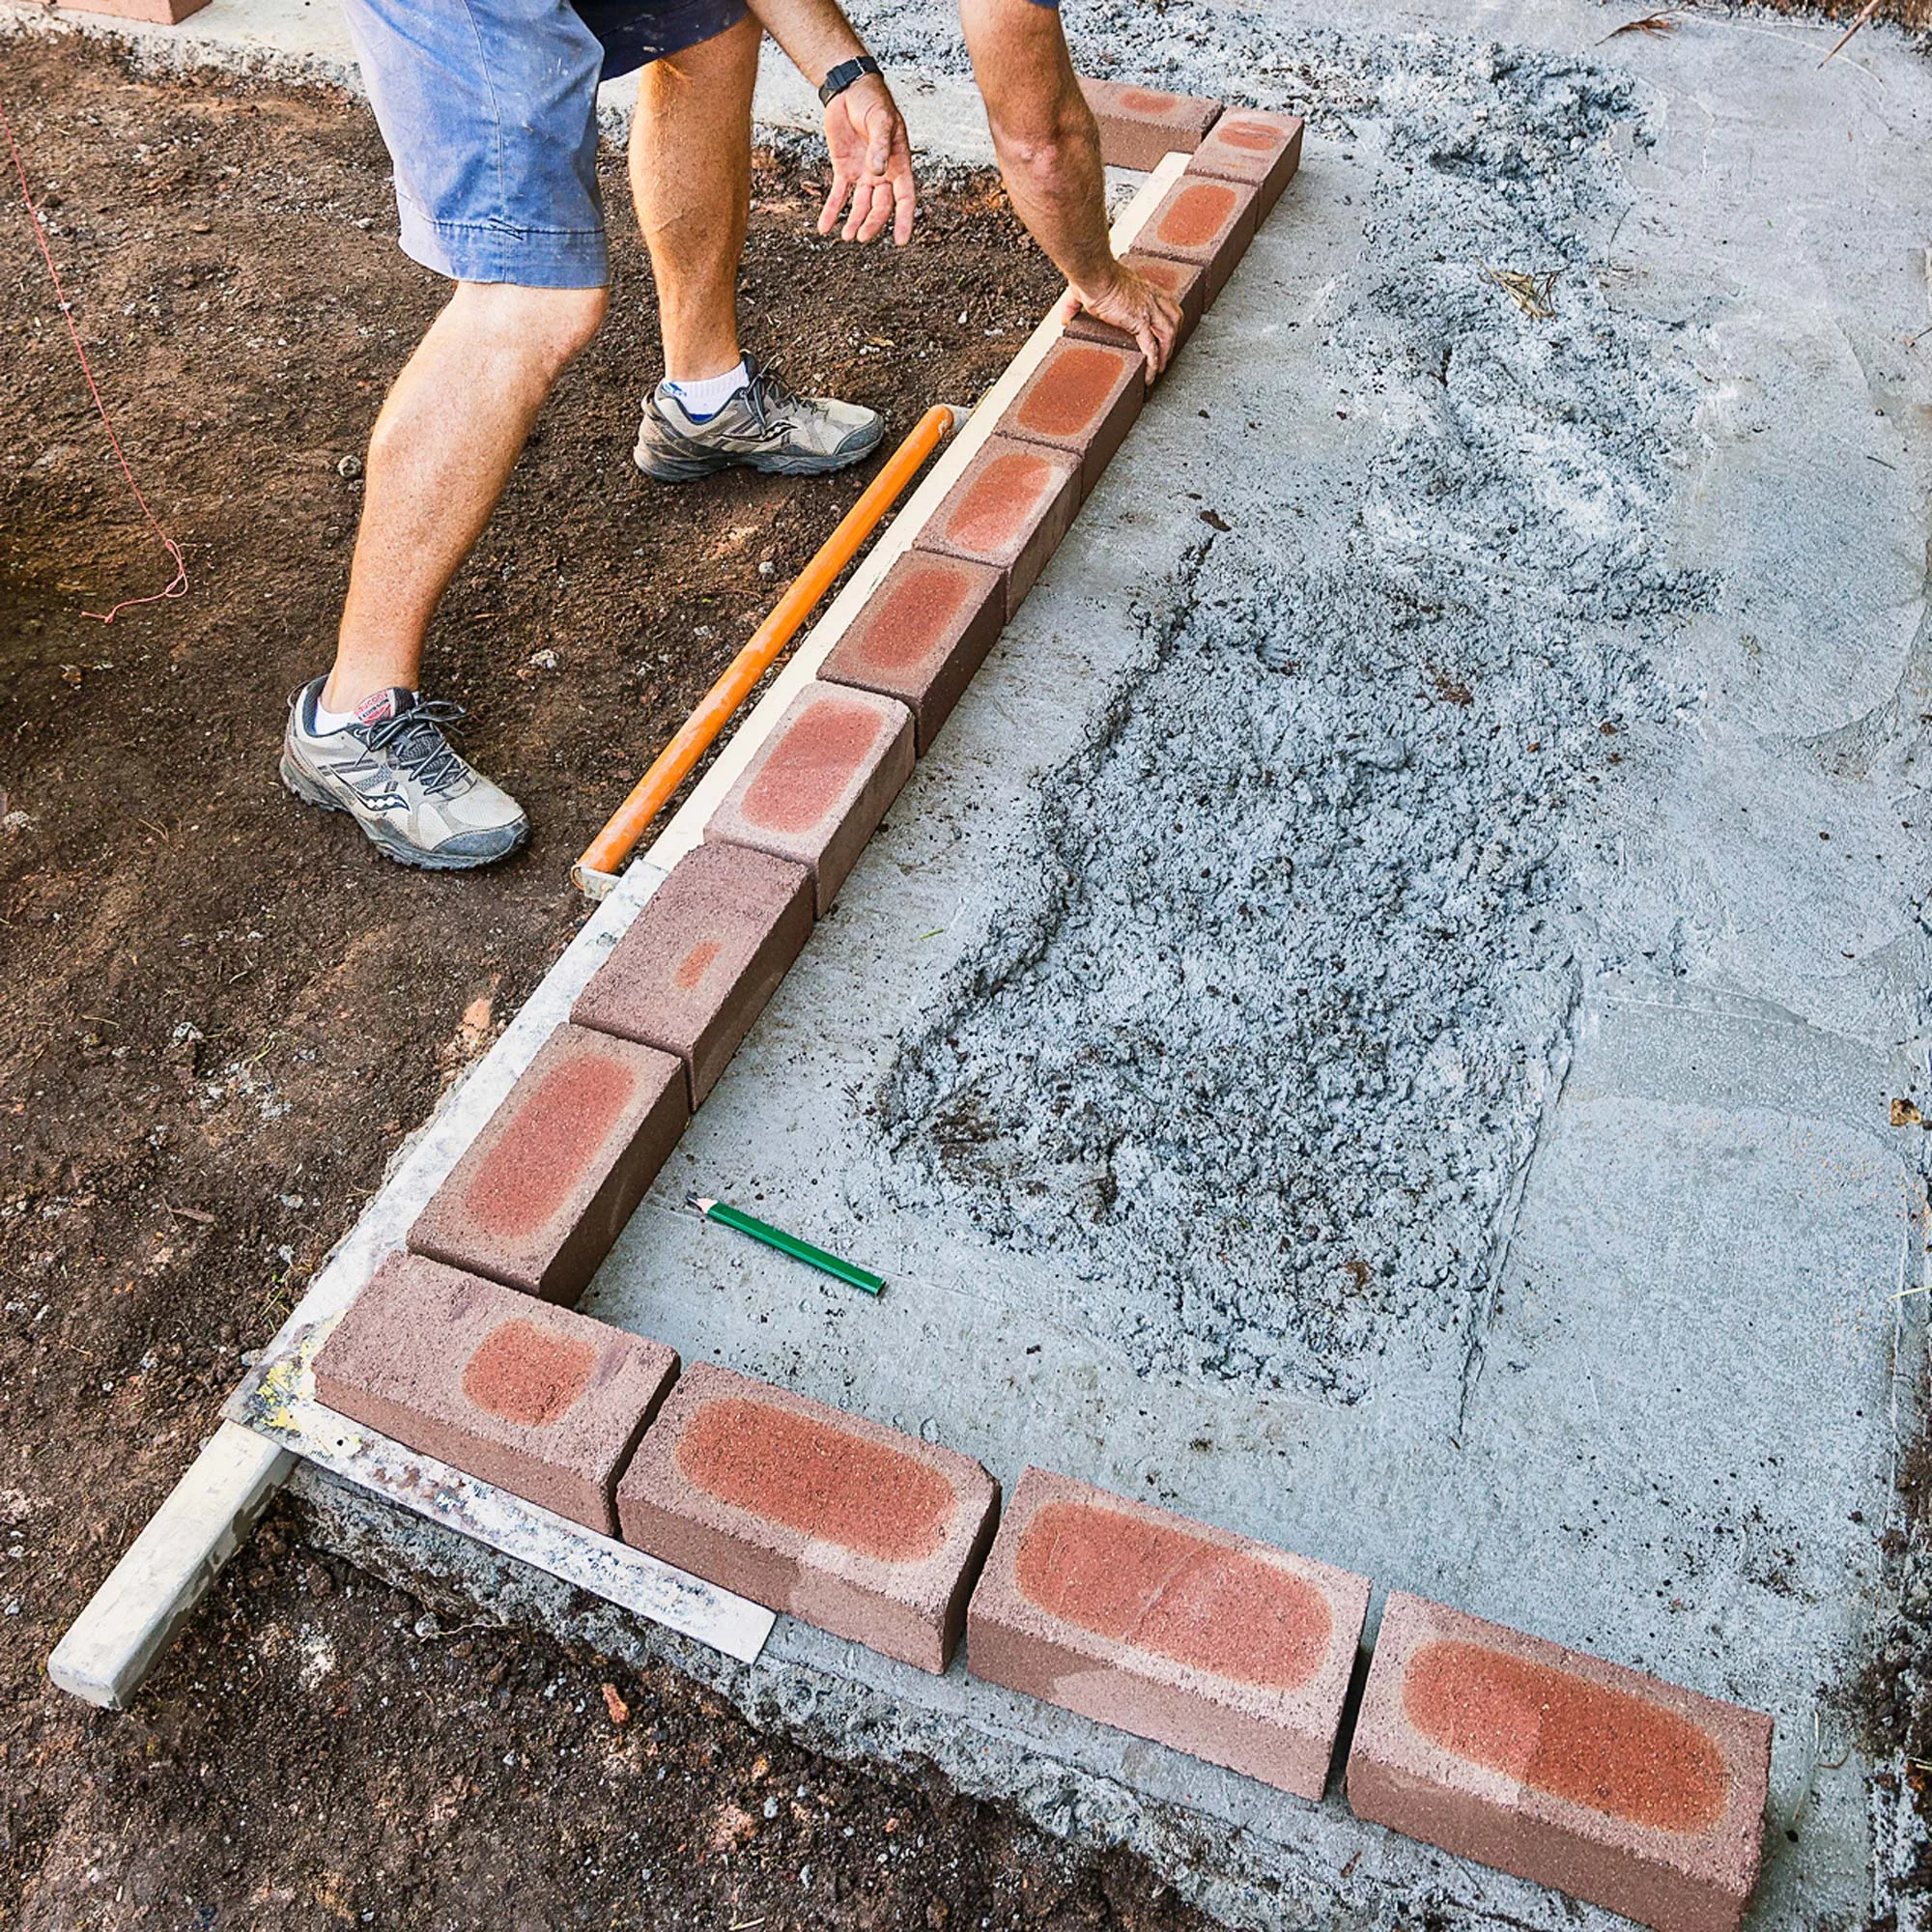
Step 5
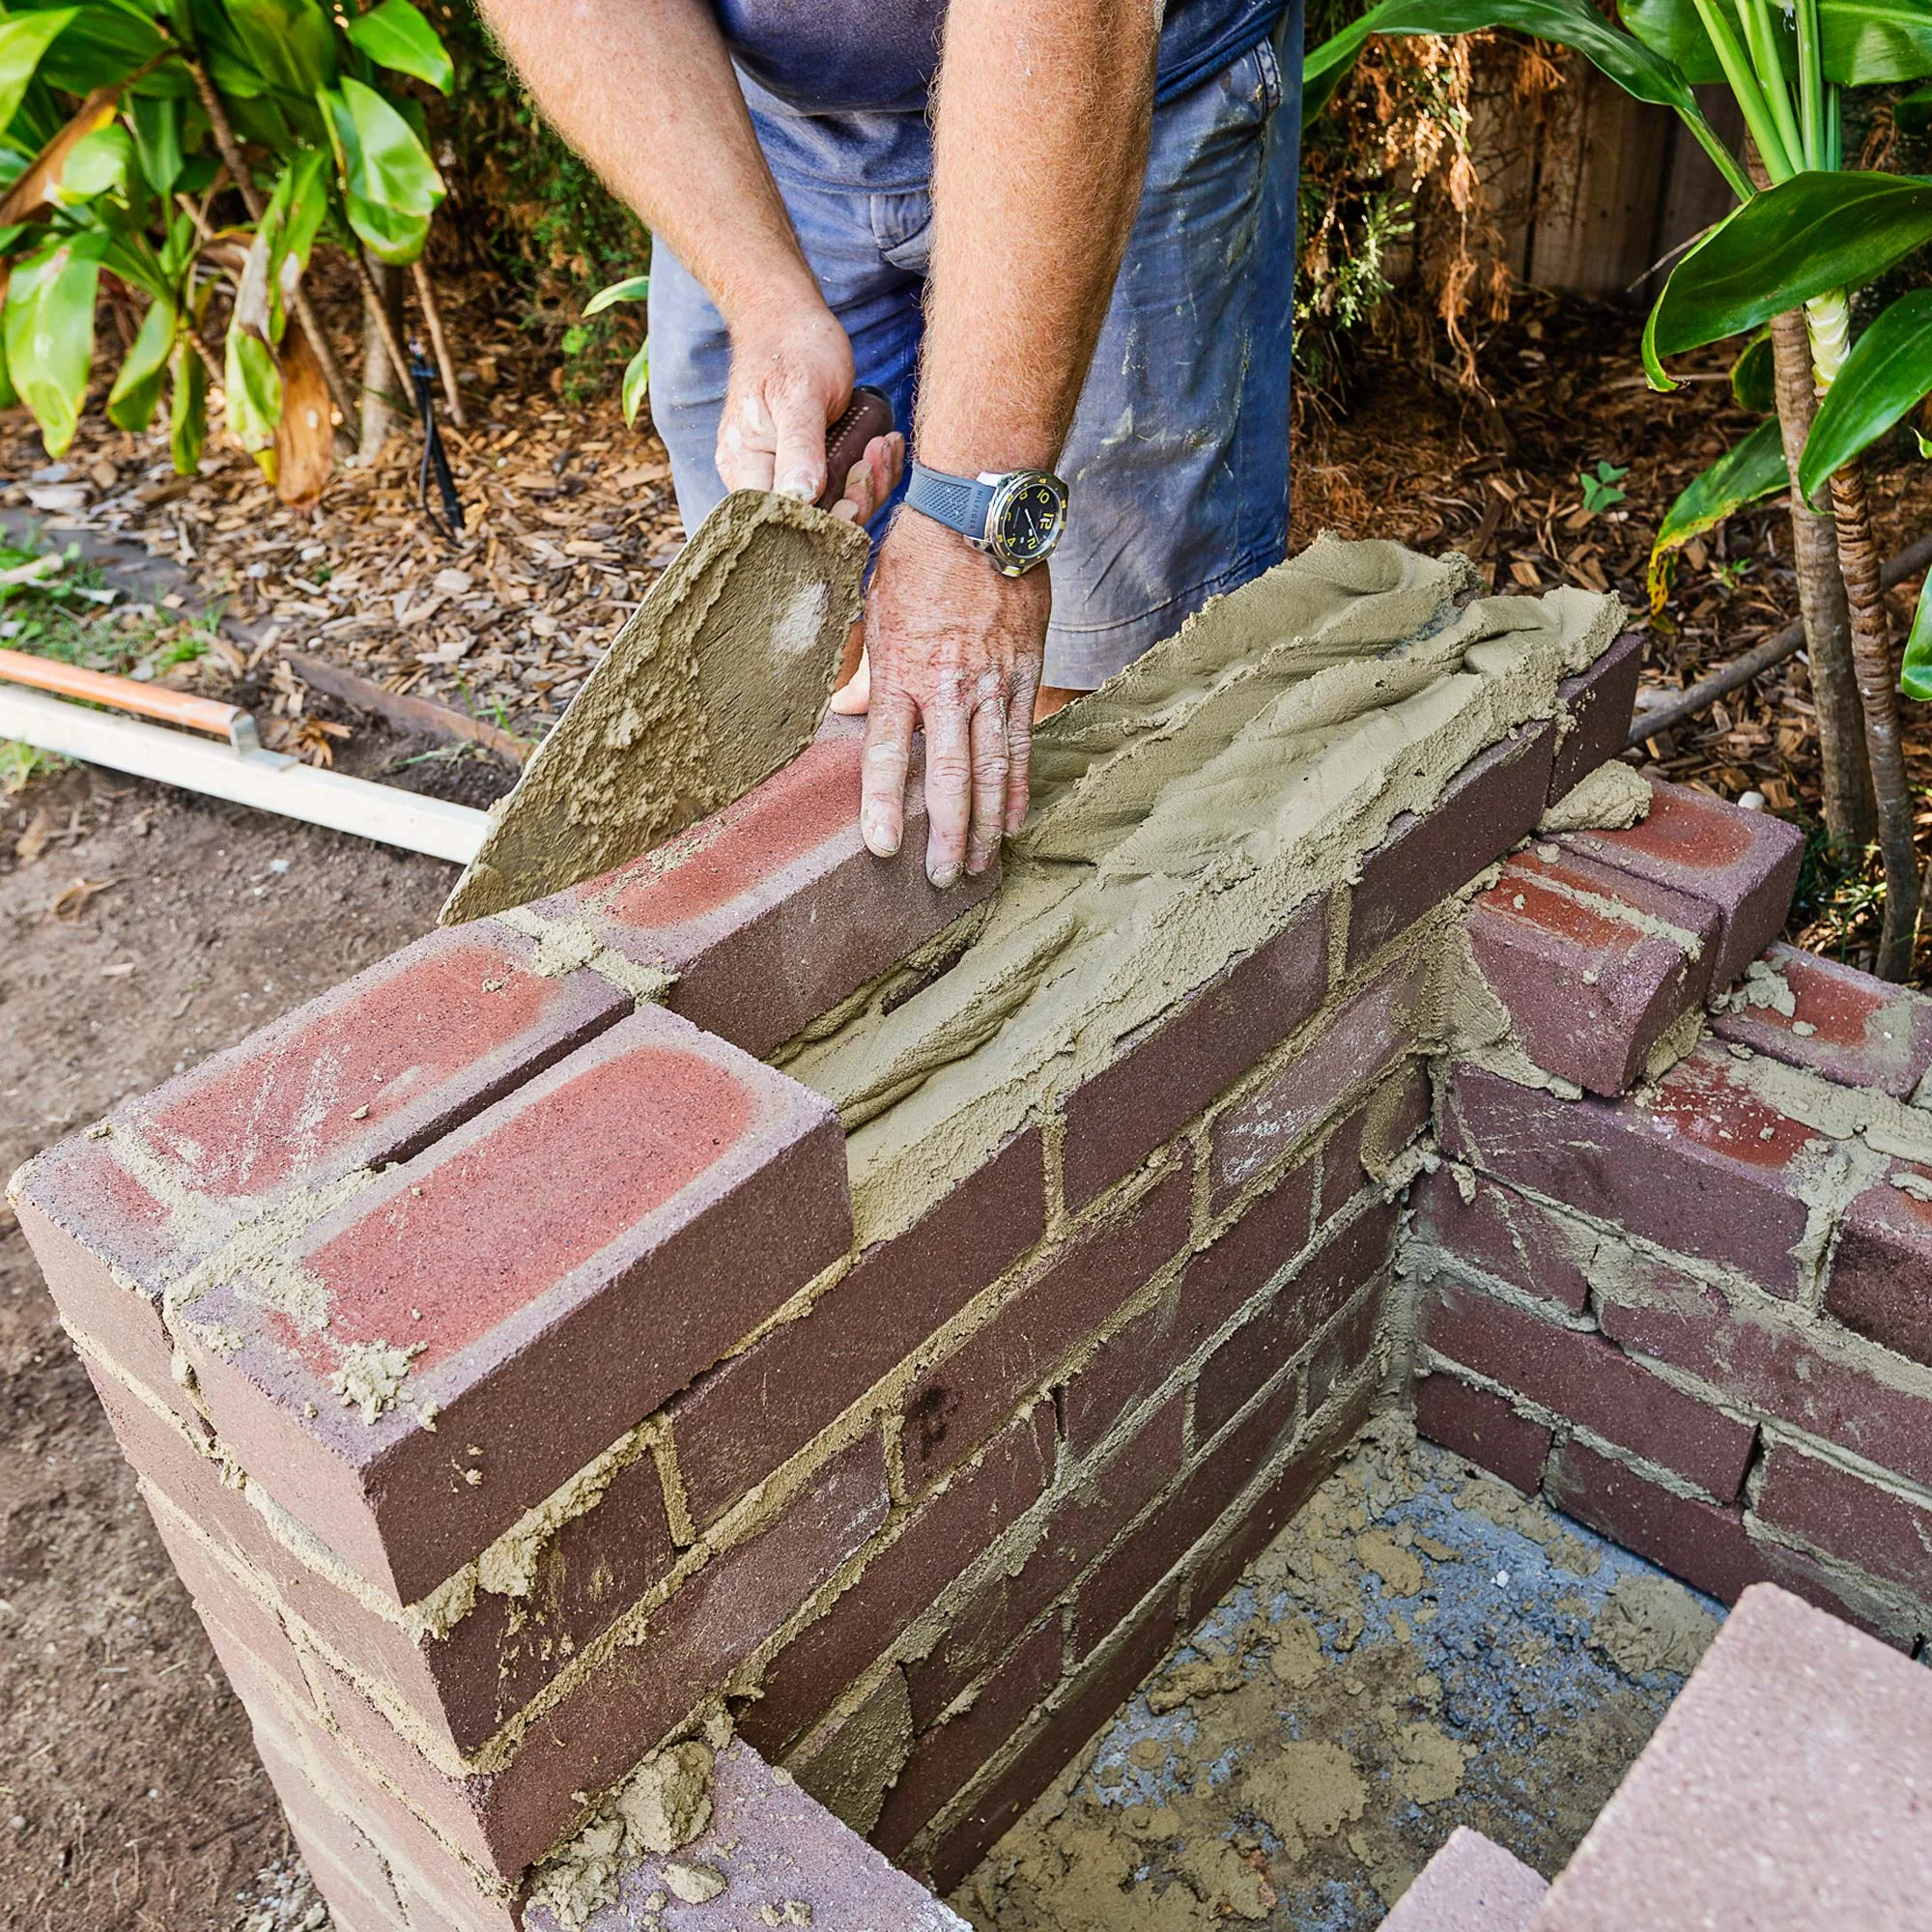
Add 6 parts brickie’s sand, 1 part lime and 1 part cement to wheelbarrow and mix until they form a consistent colour. Slowly add water and stir until mixture is stiff but malleable. Make small batches at a time. If using a cement mixer, place a little water into mixer first, then shovelfuls of sand, lime and cement in same ratio. Add water until you get the right consistency. Wet bricks and set them up in stacks with small pieces of plywood for mortar.
Step 6
It is important to build up corners first, ensuring they are plumb and level. Starting in 1 corner, lay a bed of mortar inside pencilled line for 500mm from corner. Using tip of trowel, make a furrow down middle and lay corner brick so edge lines up with marks. Tap down into mortar until you have a joint 10mm thick. Using trowel, remove excess mortar.
Step 7
Butter end of next brick by scraping a small amount of mortar along vertical edge. Lay against previous brick and tap down into position. After 2 or 3 bricks, check level and adjust if necessary. Repeat Steps 6-7 to build front 3 corners, checking levels between corners using spirit level on top of screed.
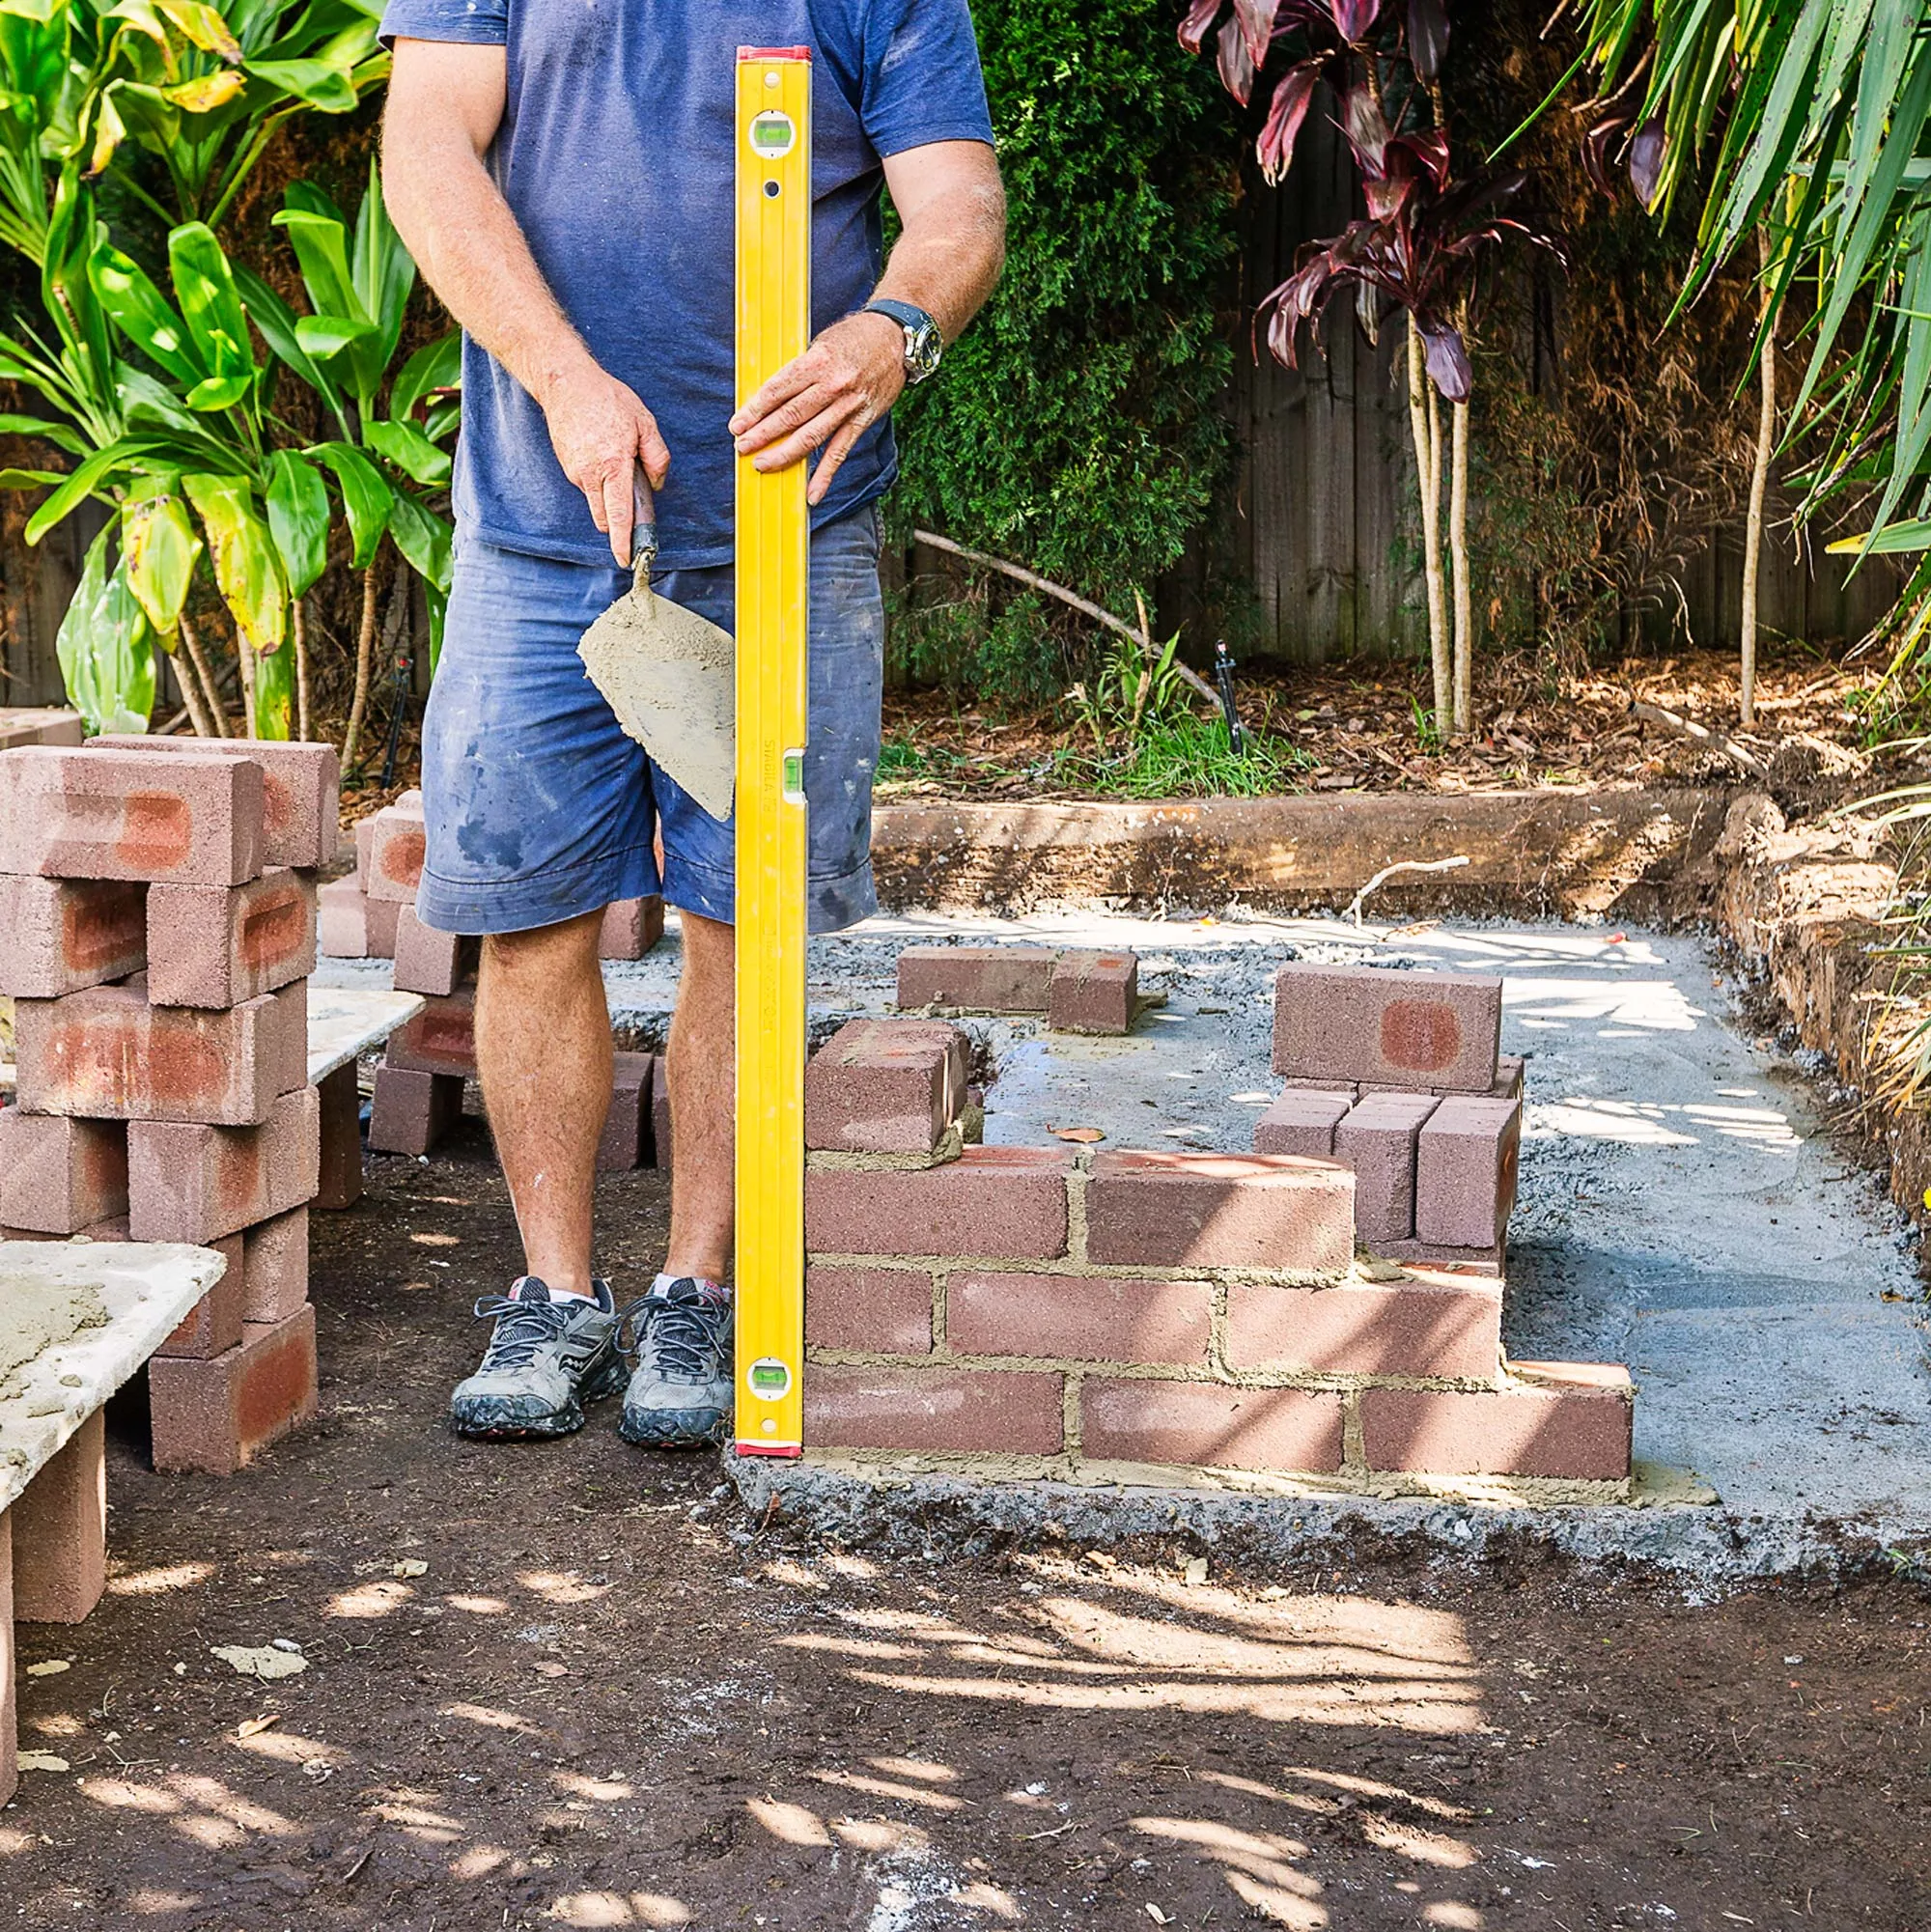
Step 8
On 1 end of spirit level, mark height of 1 mortar joint, then 1 brick, then another joint and another brick and so on – this will be used as a gauging stick. Build up corners and ends using gauging stick to keep levels consistent. Check corners are plumb and level as you go.
Step 9
Tap line pins (with stringline attached) into mortar joints on same course, so taut stringline lines up with top edge of bricks. Lay bricks between corners so top edge meets stringline. Every few bricks, check course is level and plumb. Once course is complete between corners, move pins and stringline up to next course. For top where there is no mortar for pins, wrap stringline around a brick and use other bricks to weigh it down.
Step 10
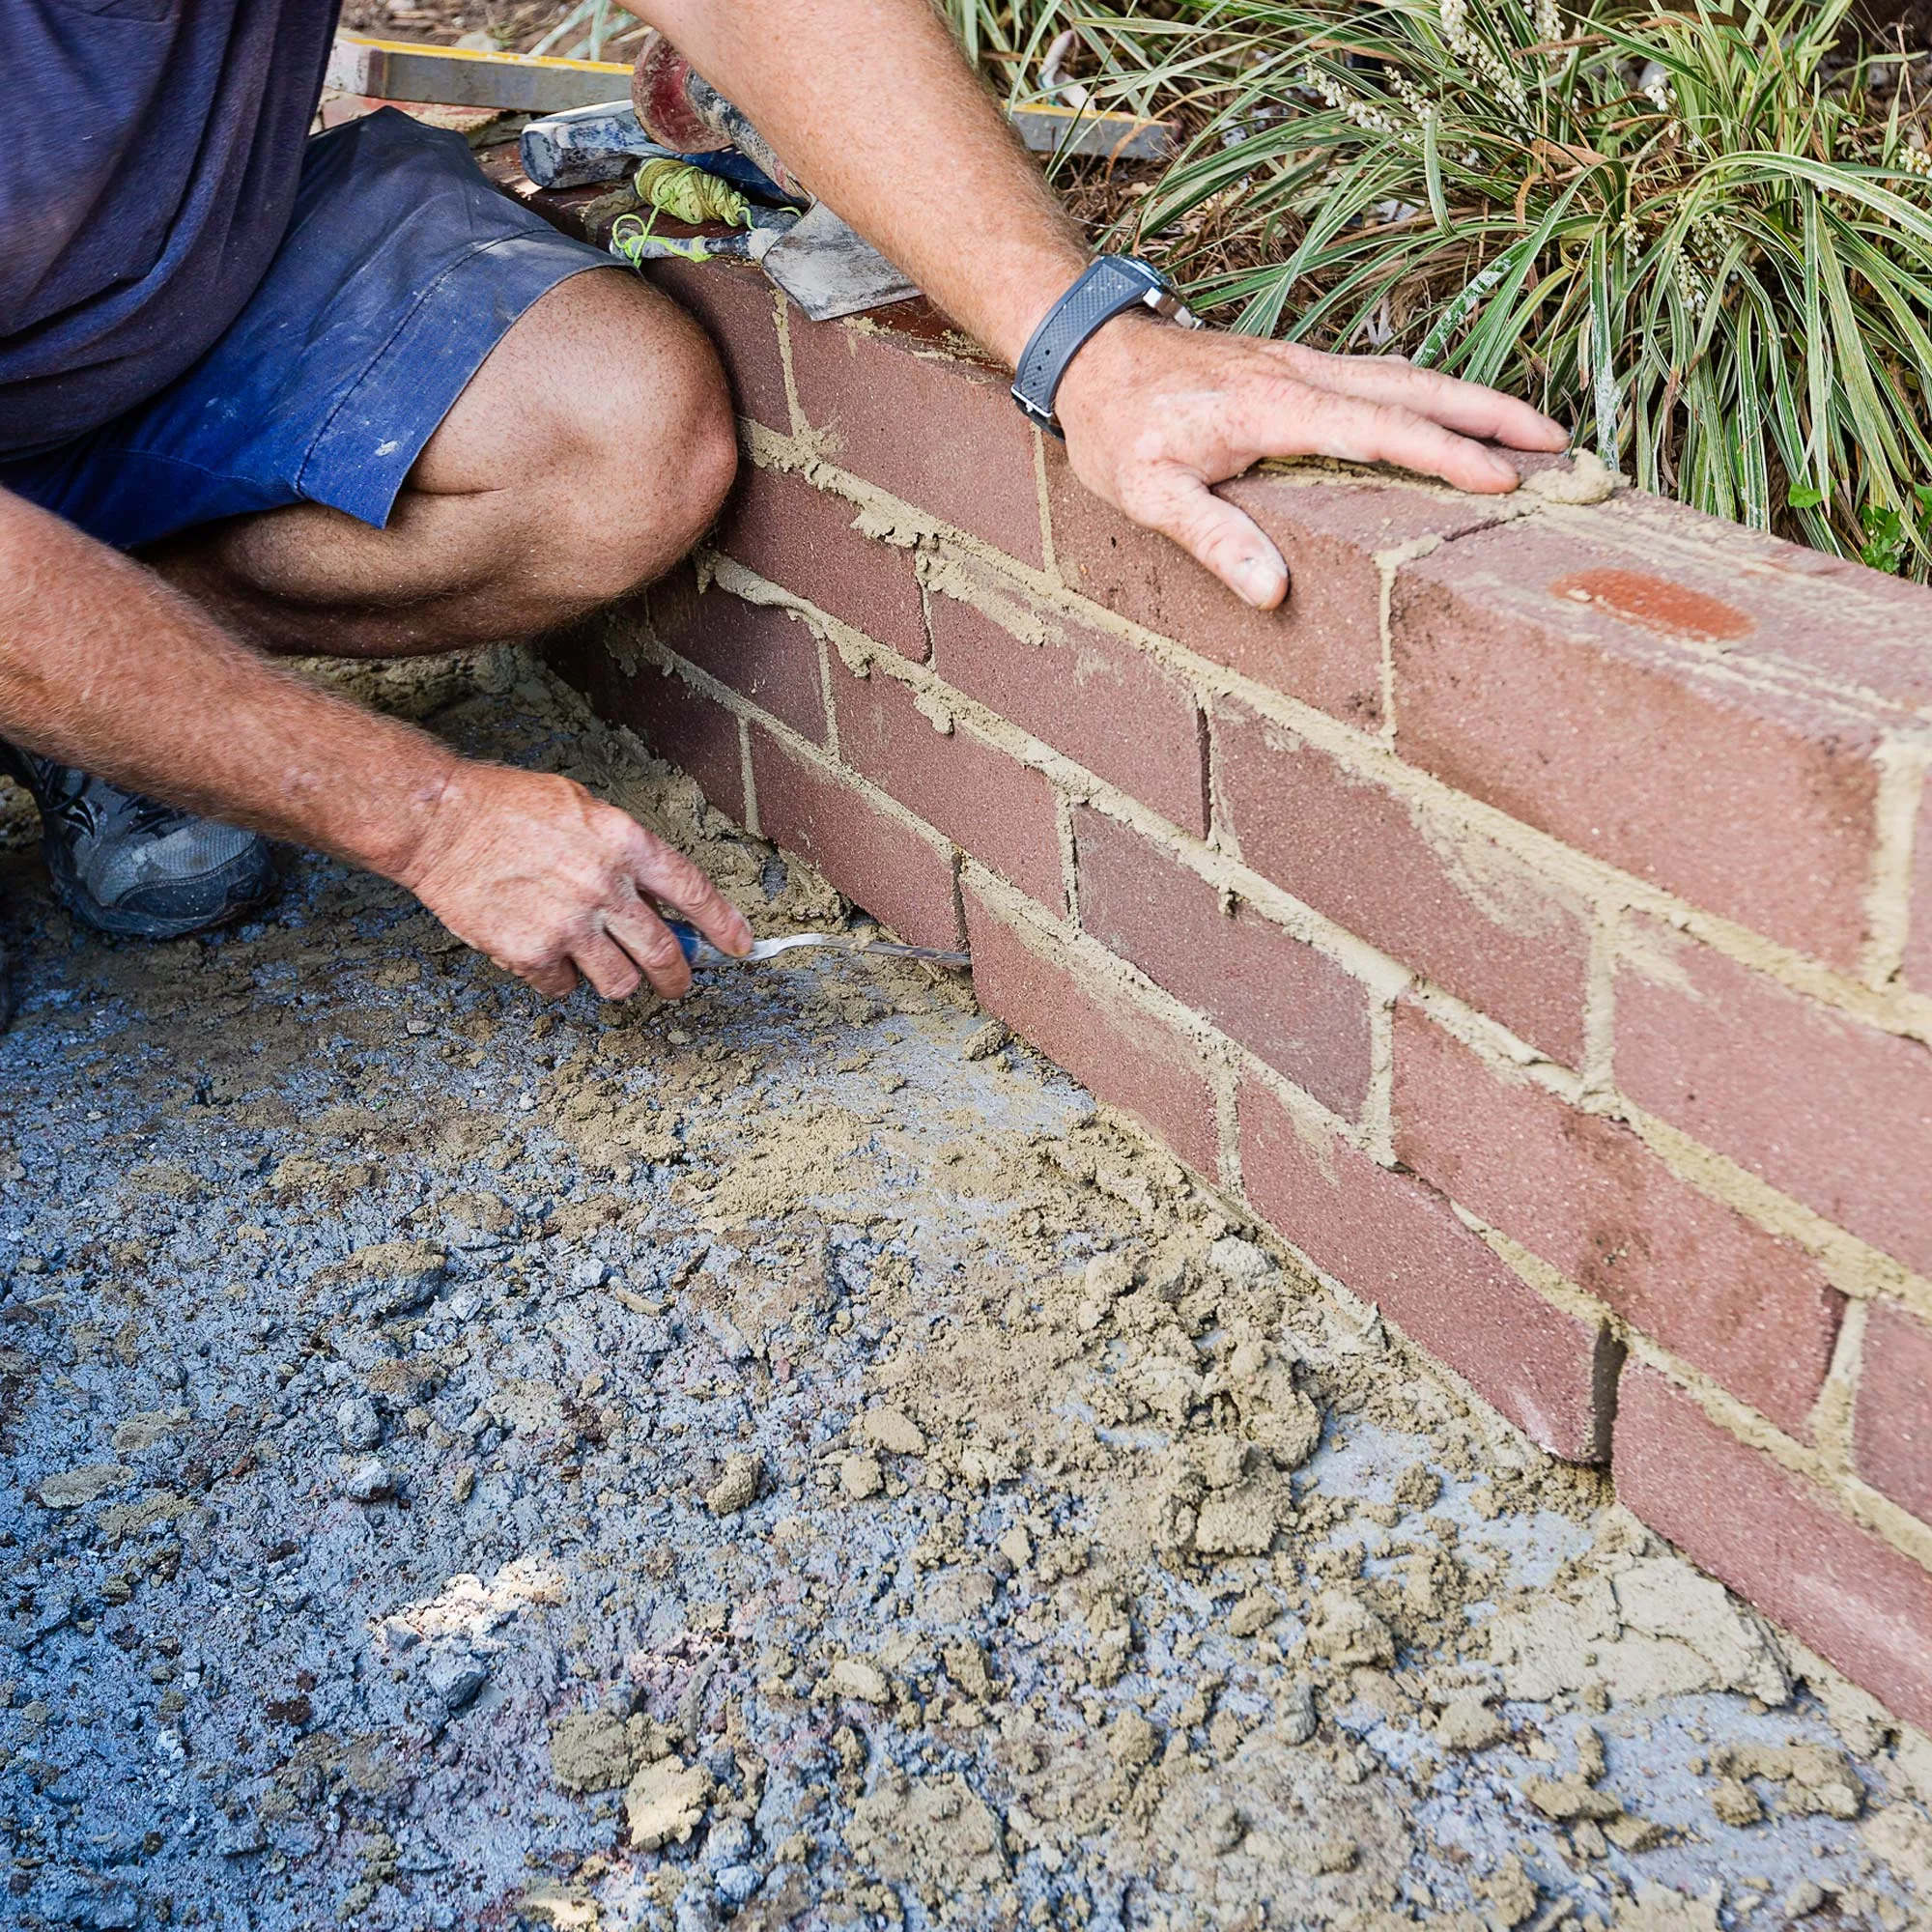
While mortar is wet, scrape out every second vertical joint along bottom course of single-skin walls. These are weep holes and will let water drain away. Using a damp sponge, wipe off any excess mortar.
Step 11
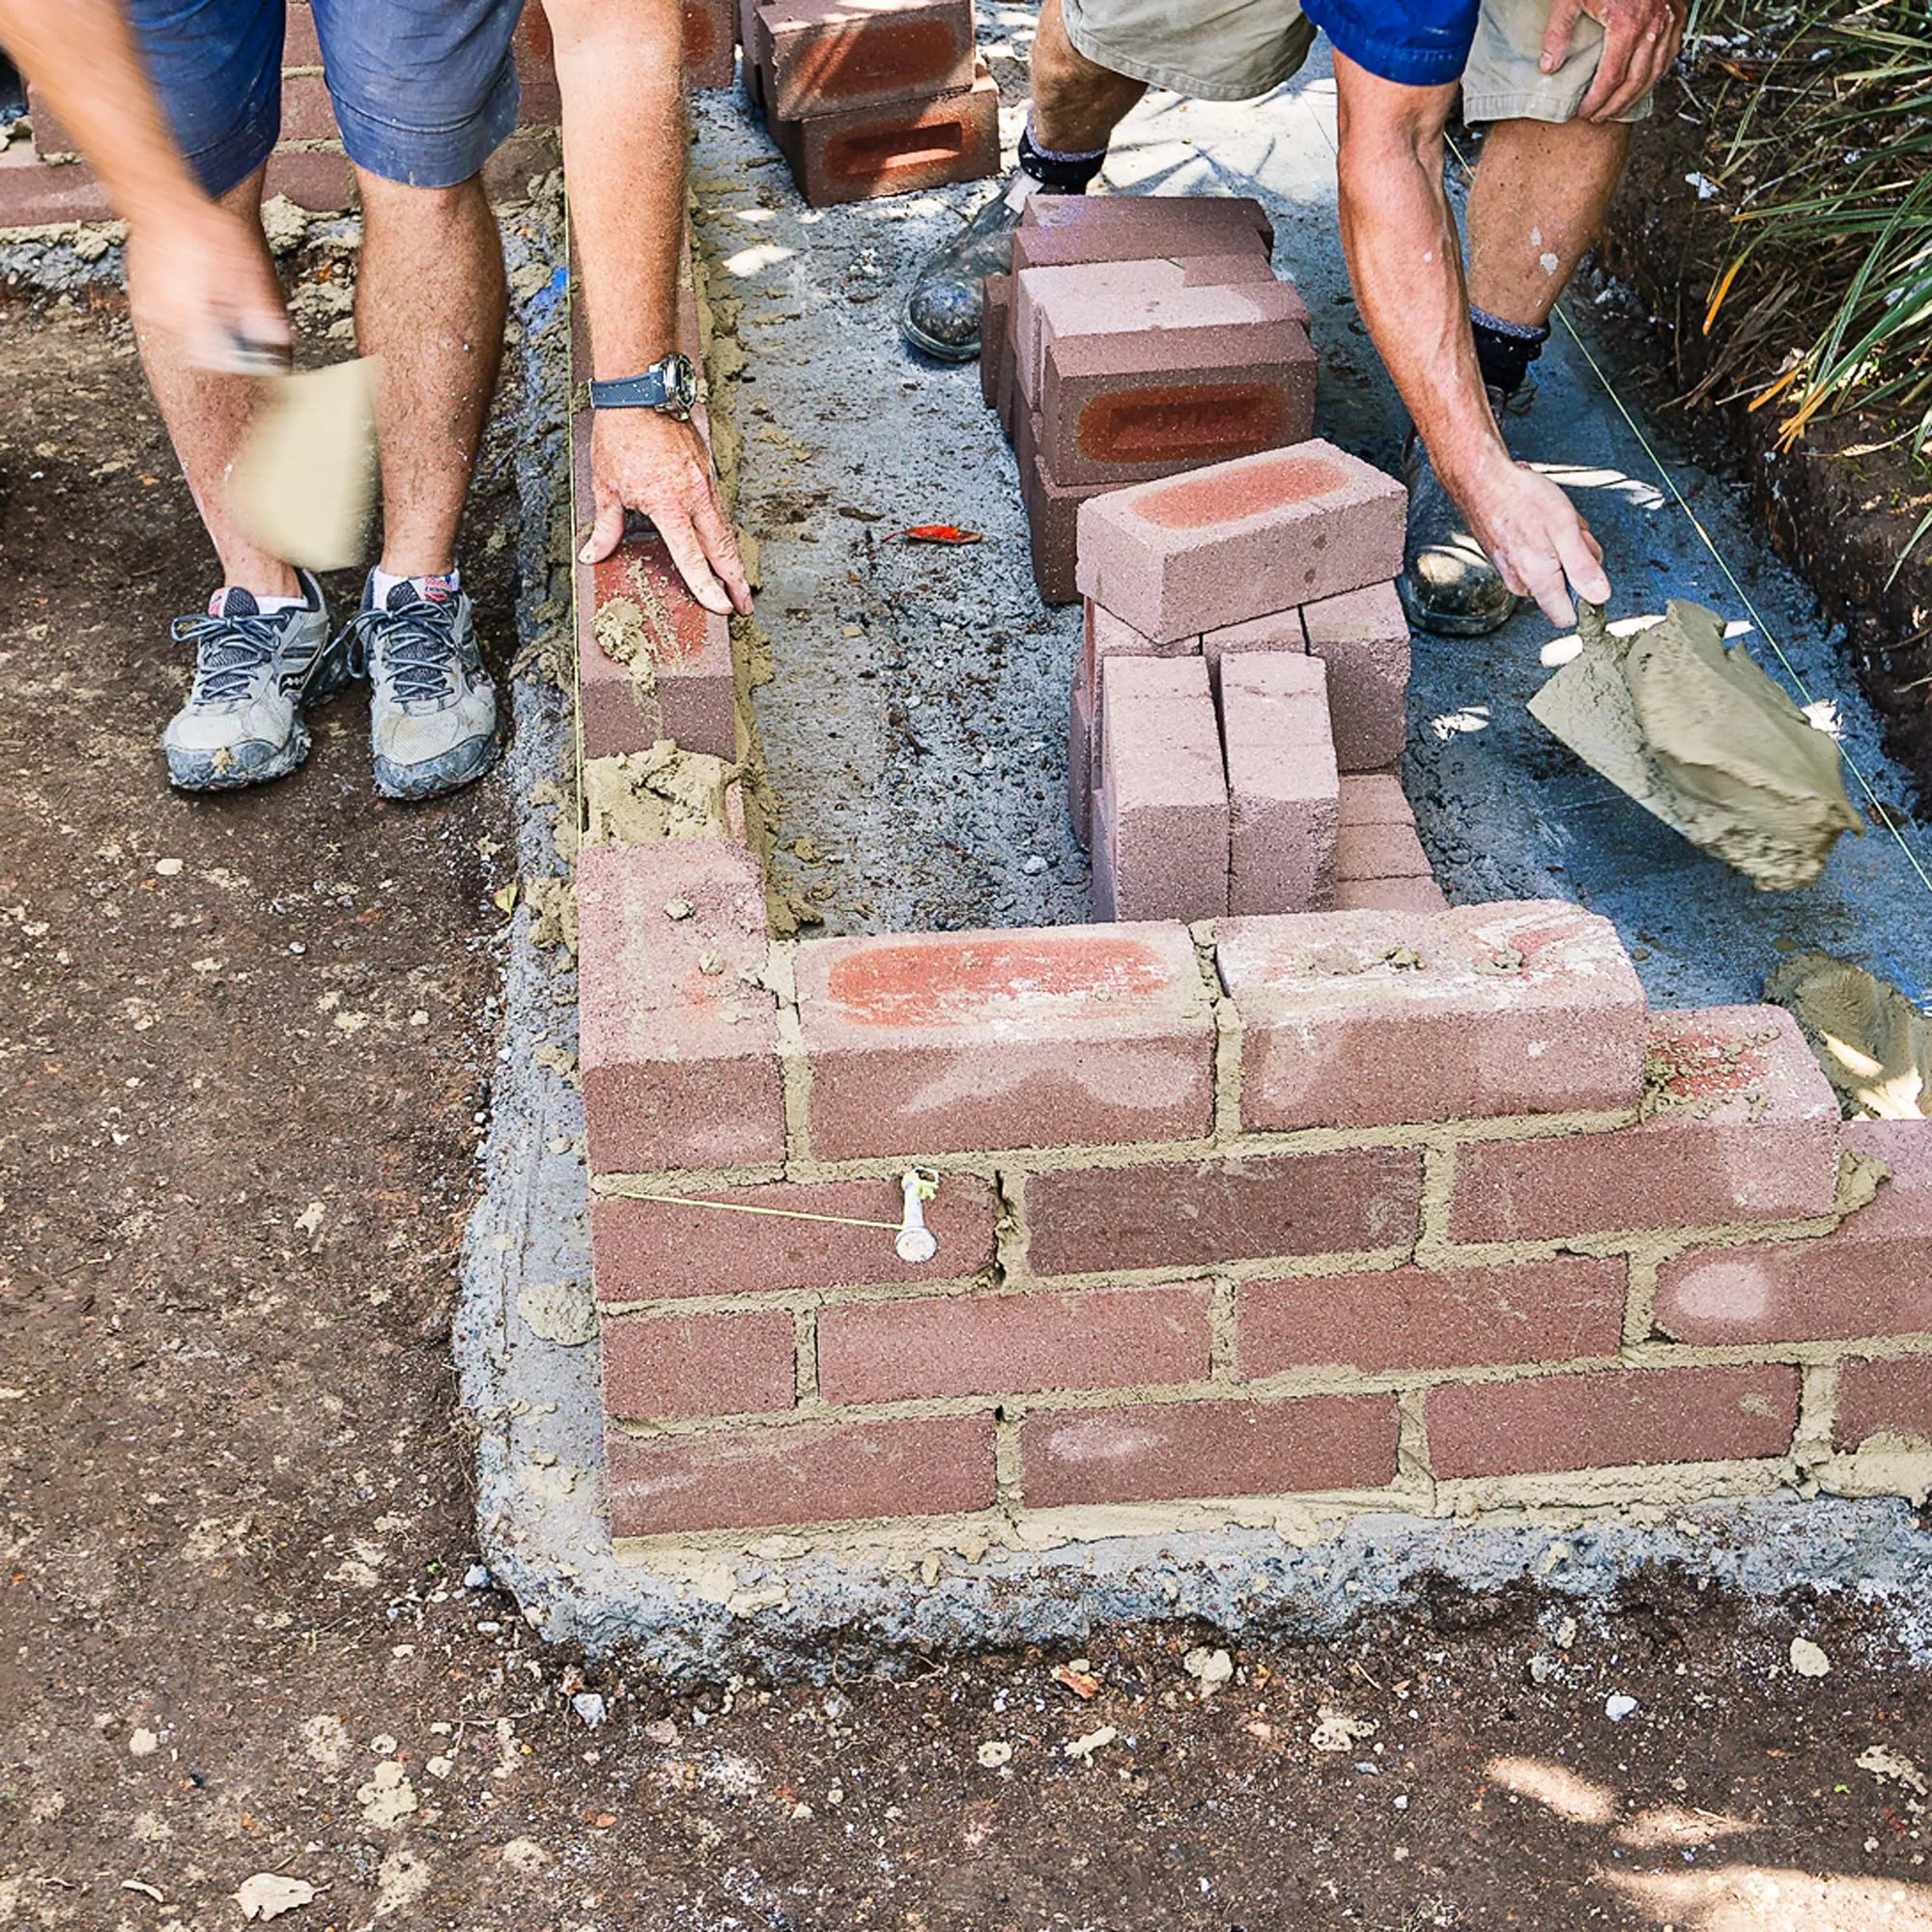
Continue to build as follows: front walls are 4 courses high with double-thickness walls at sides for armrests continuing up another 4 courses, the last of which is header course where bricks are laid across wall; add an internal skin to back wall that is 4 courses high (to support bench), while outside wall continues up another 6 courses; there is also a 4-course-high pier added to side wall to support bench. For double- thickness walls, lay a second row of bricks alongside first. Use a full brick laid across double width on end of next course to maintain your bond.
Step 12
Position timber edging at edges of area, hammer in wooden pegs at equal intervals and nail edging to pegs. Spread road base in area, thoroughly wet and, using plate compactor, make this a firm base. Cover road base with river pebbles.
Step 13
Using bugle-head screws, screw main bench long sides (A) to main bench crosspieces (B), spacing crosspieces 425mm apart in centre.
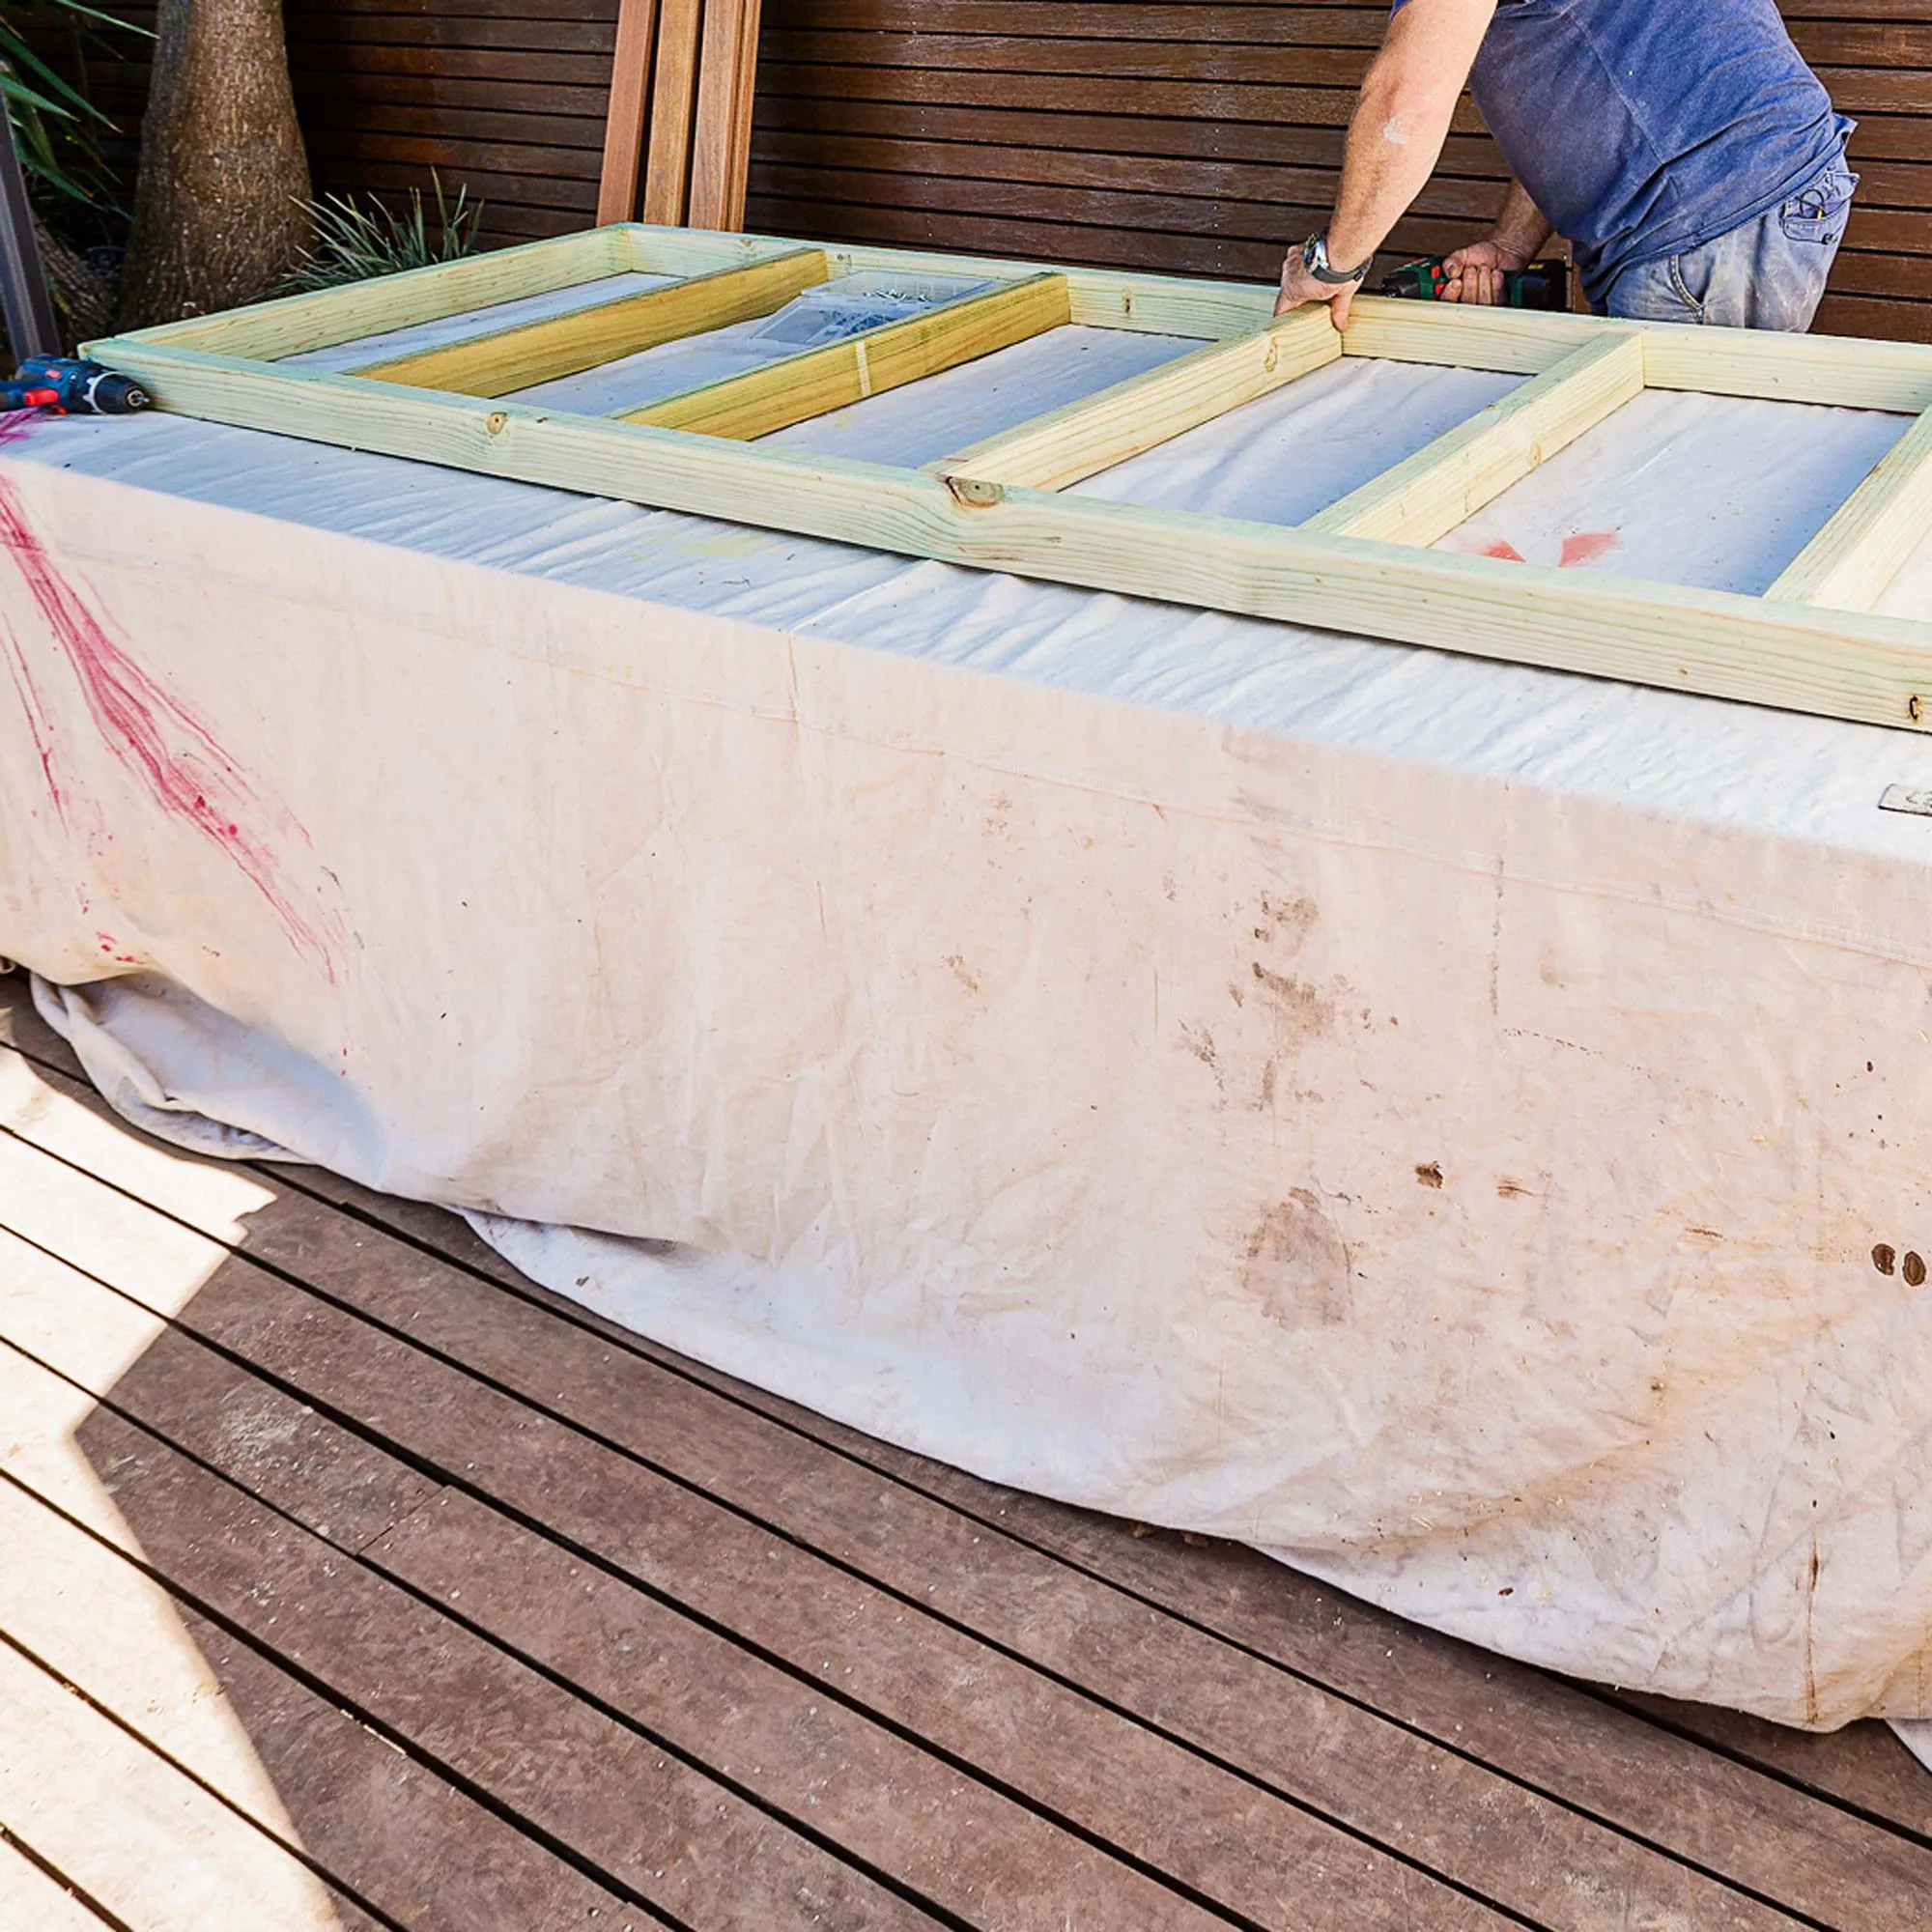
Step 14
Screw second bench long sides (C) to second bench crosspieces (D). Screw middle rail (E) between crosspieces, then screw down blocking (F), spacing evenly.
Step 15
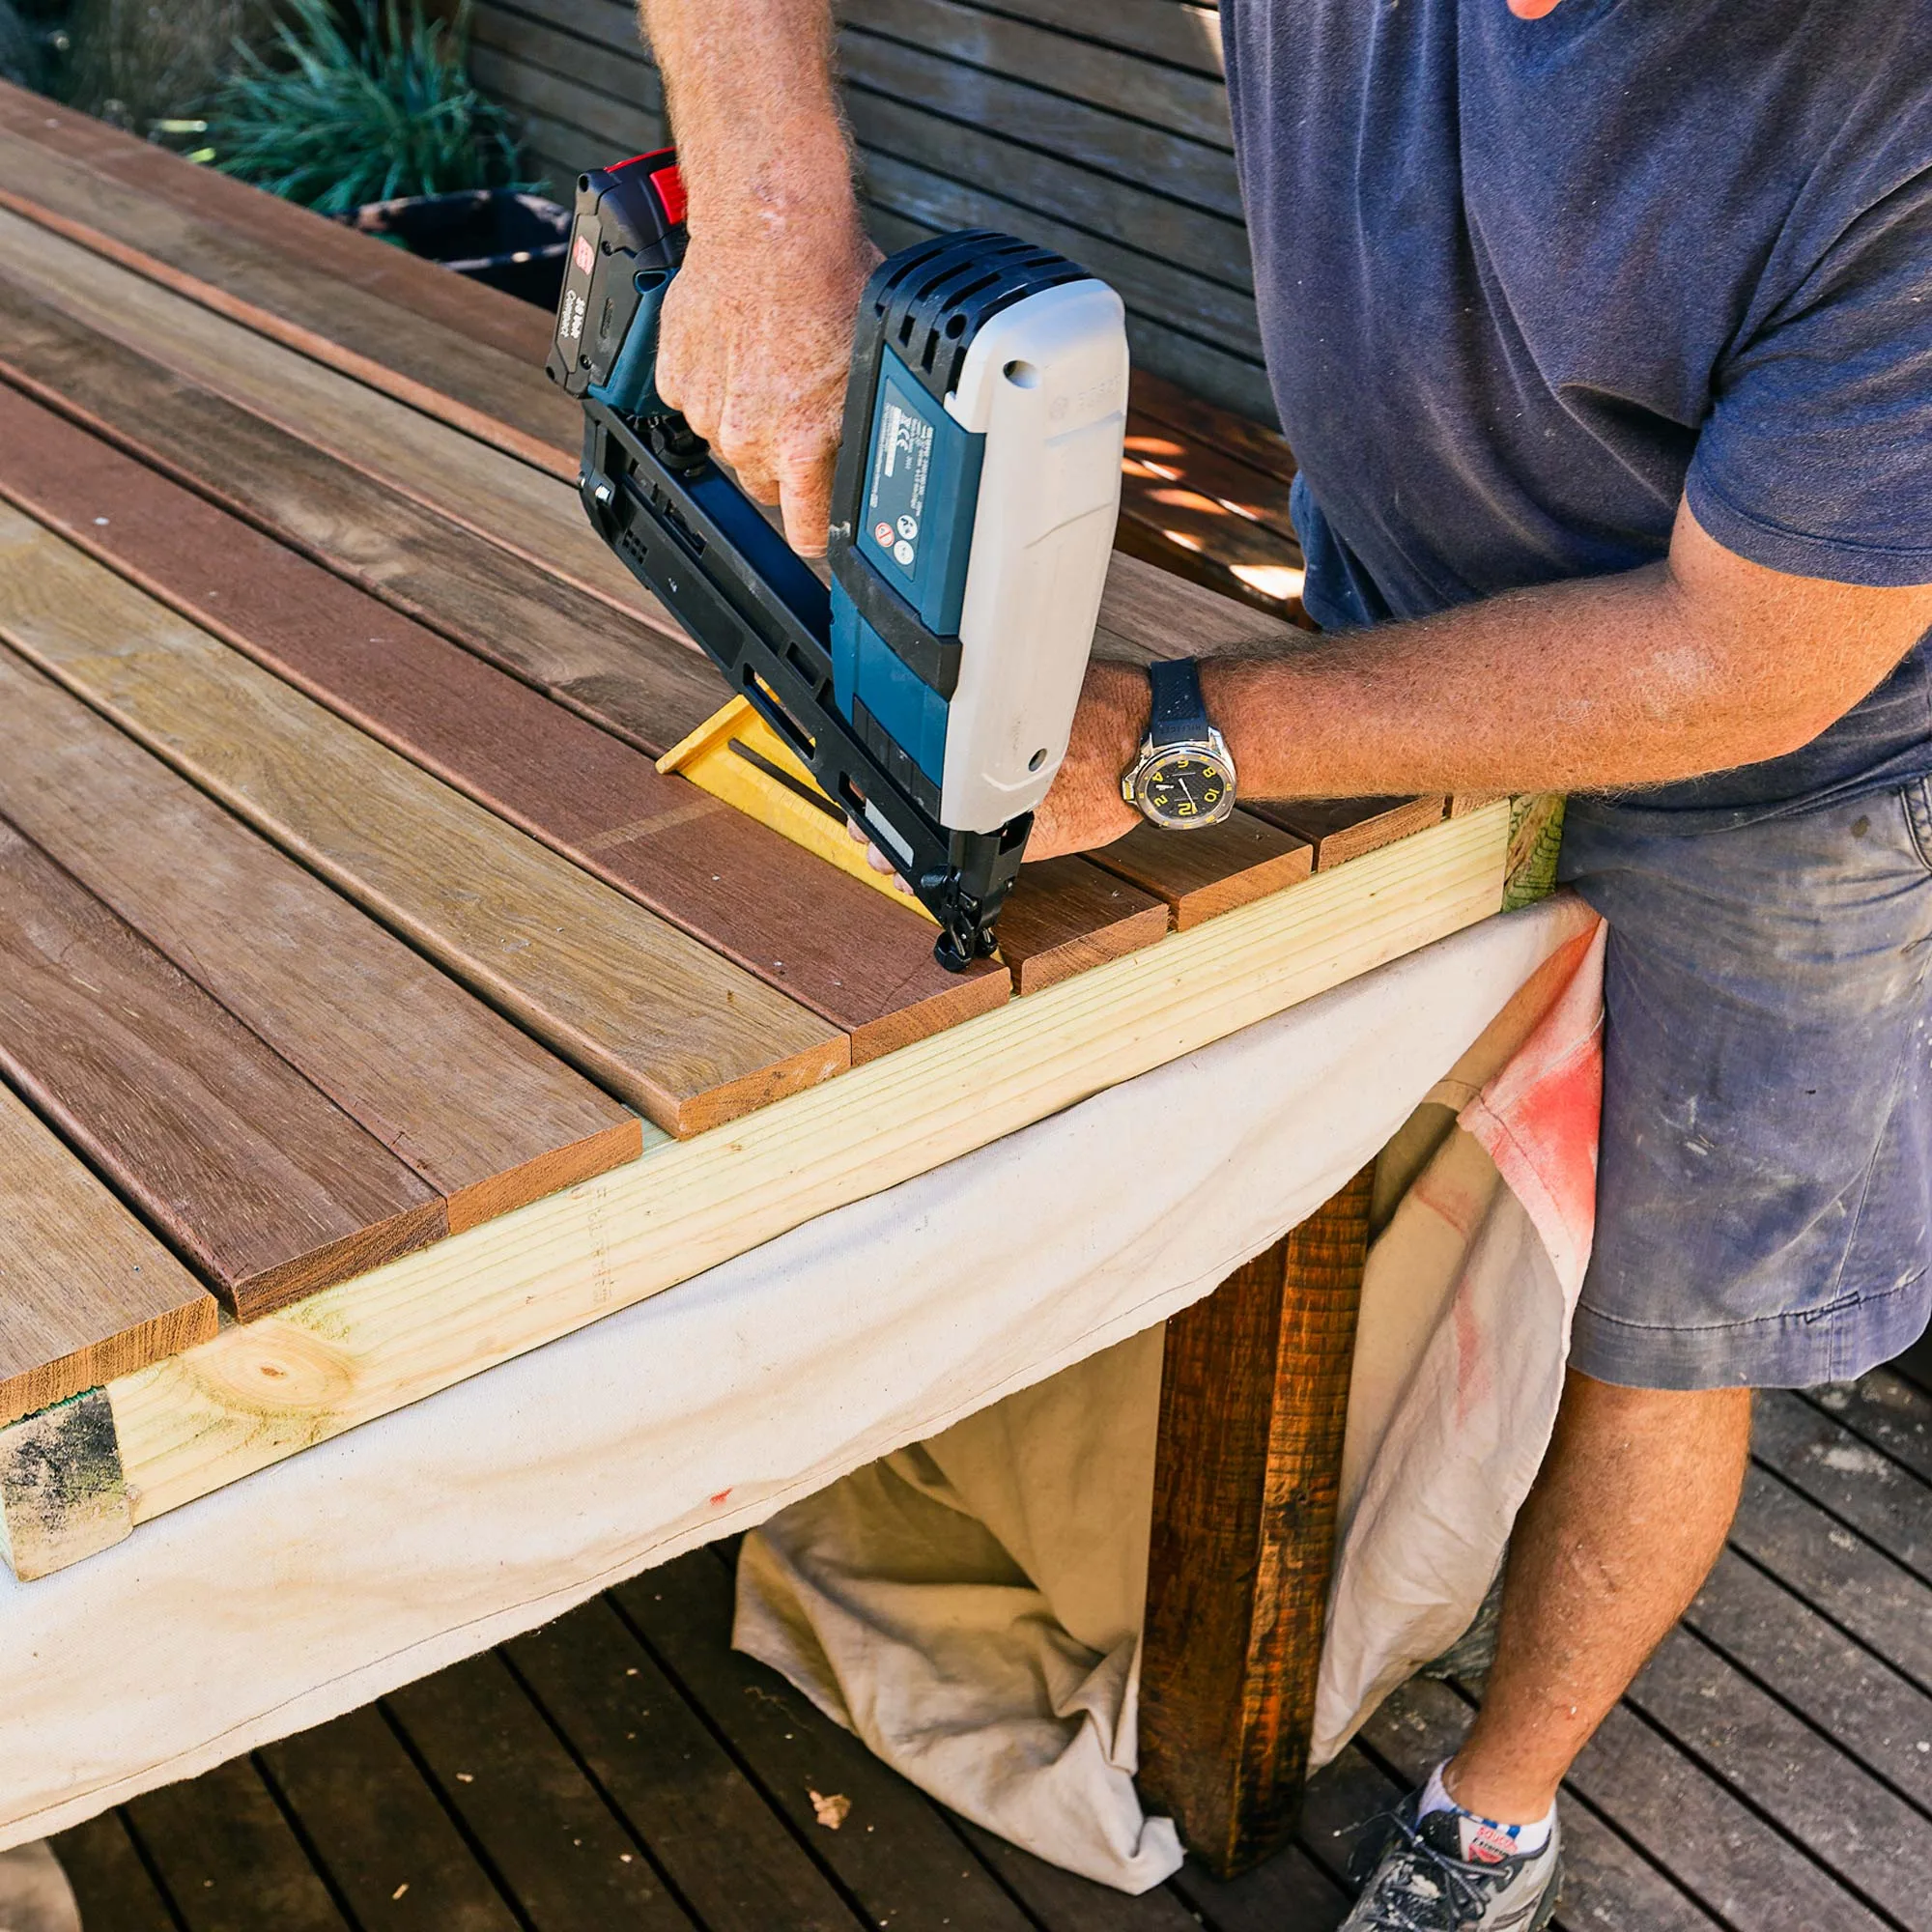
Nail main bench decking (G) and second bench decking (H) to frames, using square to measure equal gaps between boards. Paint boards in 2 coats of decking oil, allowing to dry between coats.
Step 16
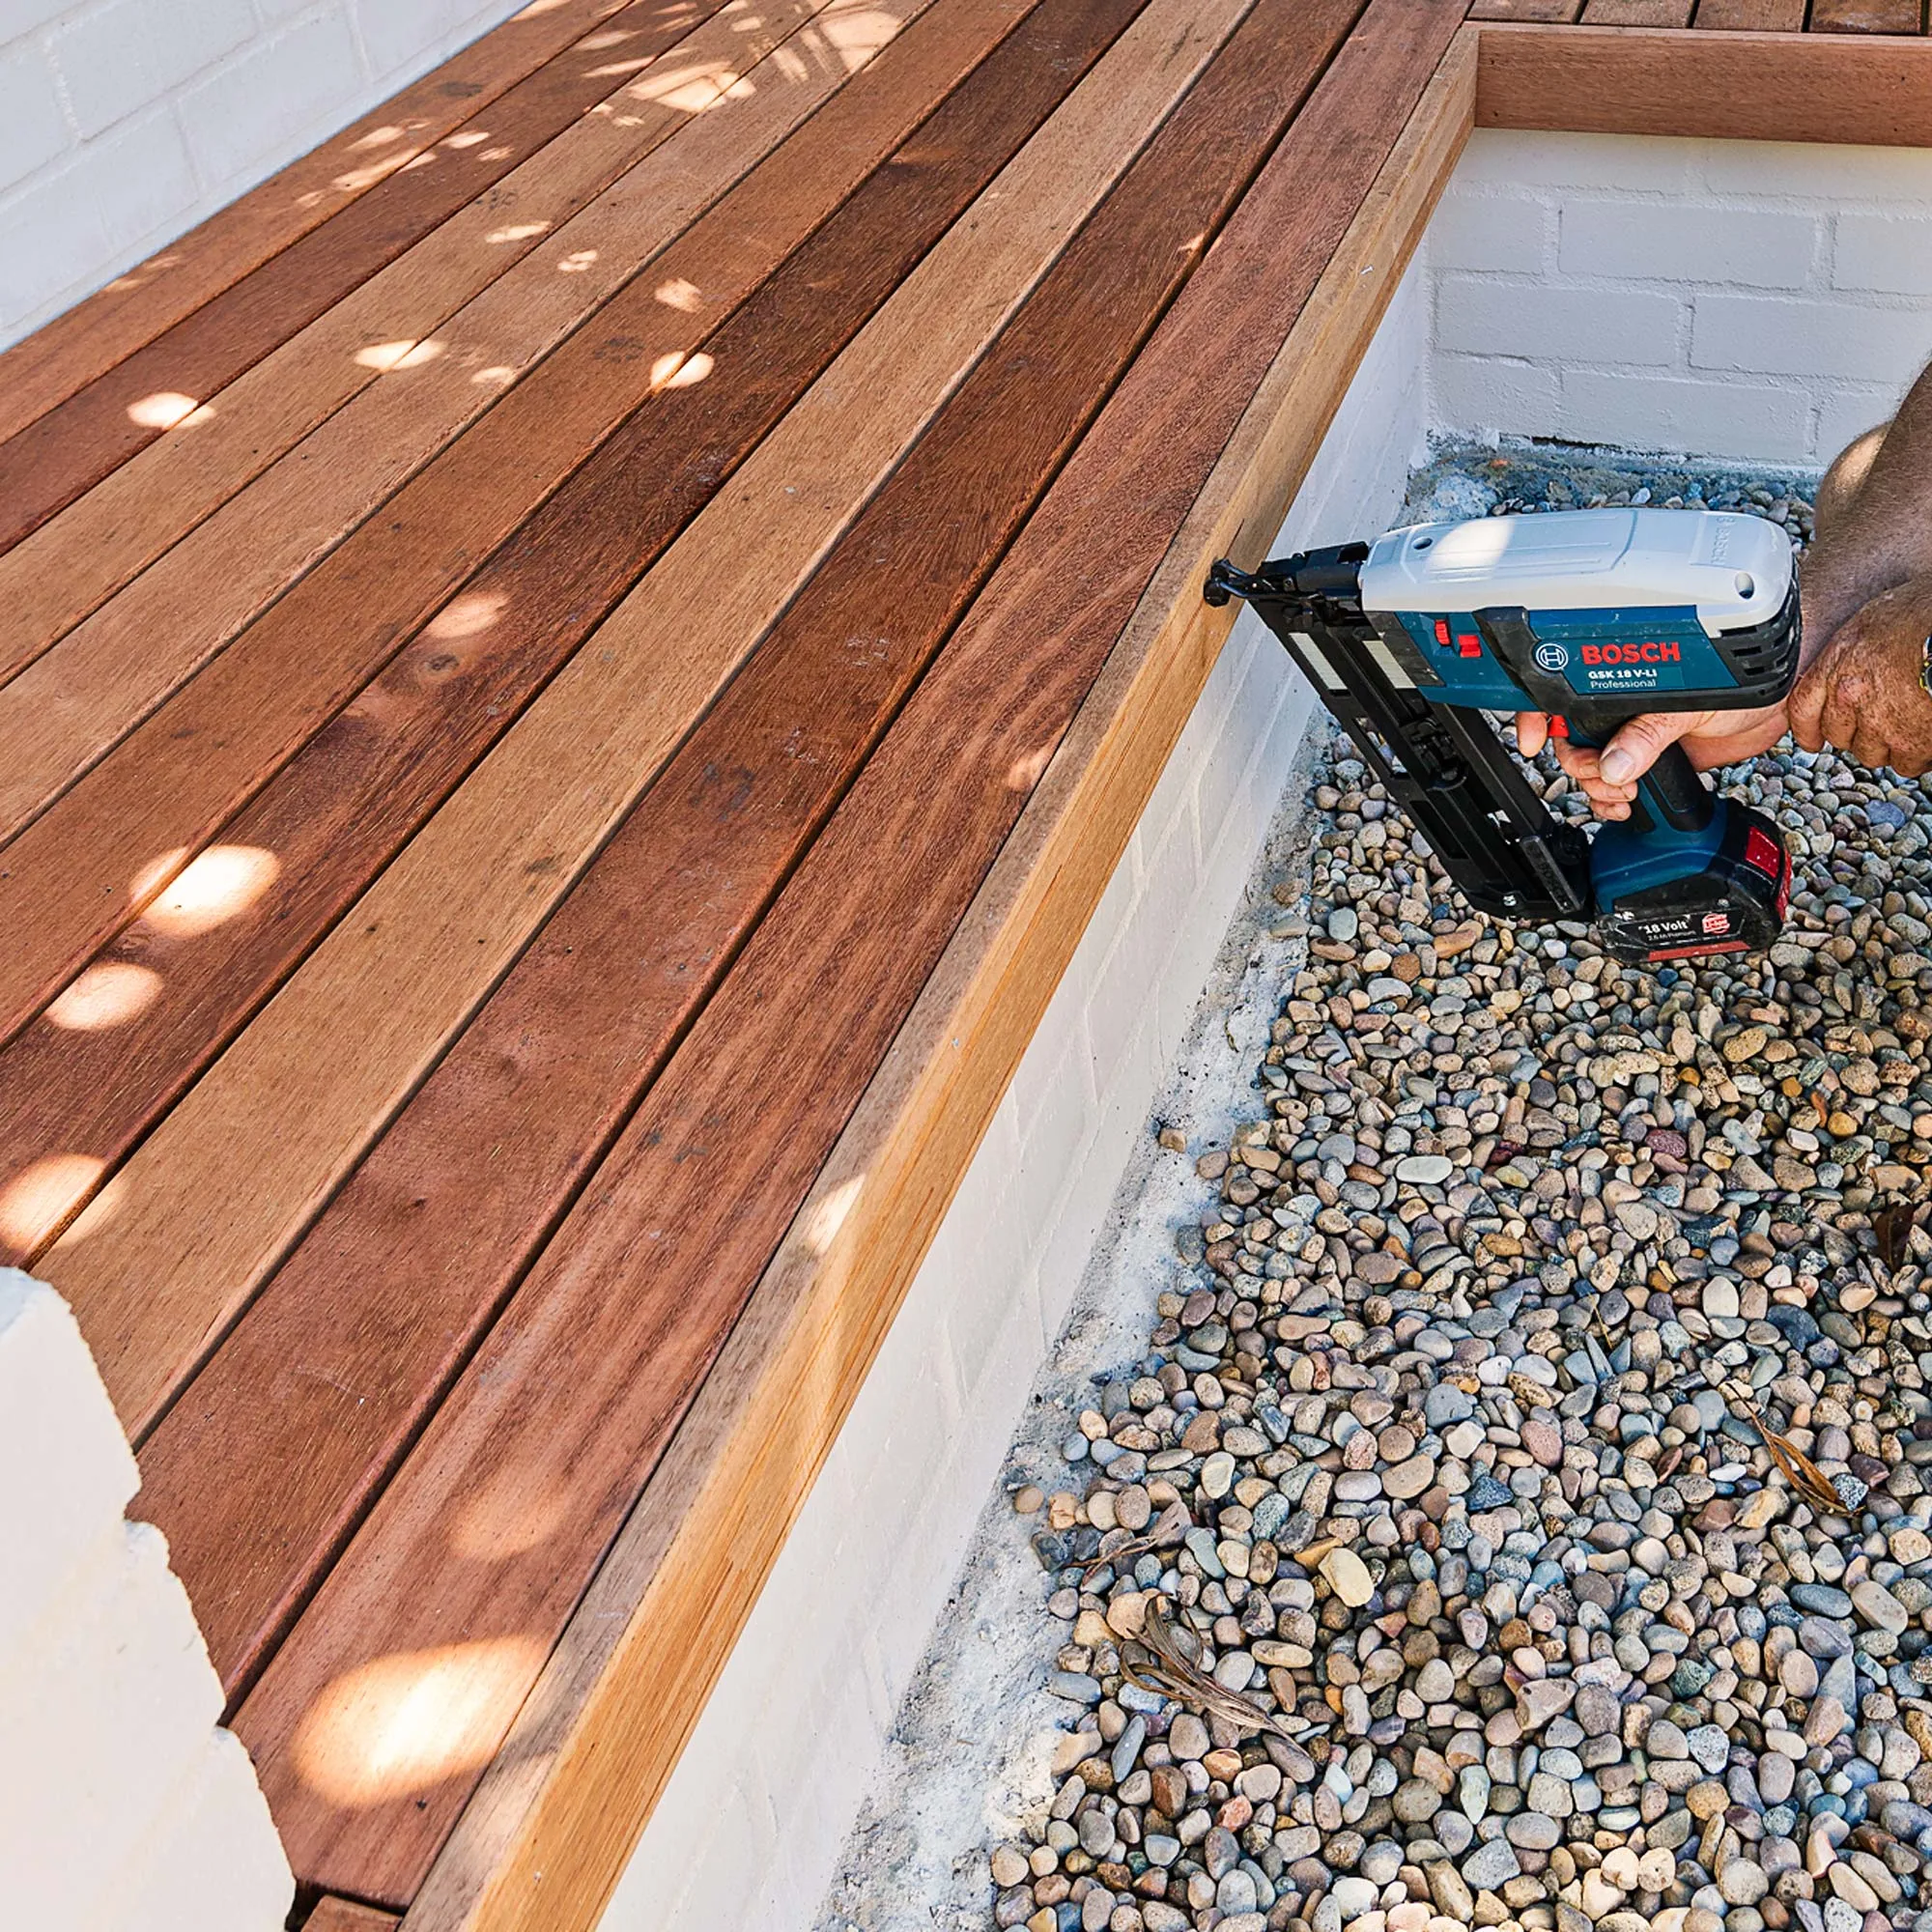
Paint base with 2 coats of Dulux Weathershield, allowing to dry between coats. Position benches in place. Nail main bench facing (I), second bench facing (J) and second bench end facing (K) to edges.
Related stories

Native ad body.
Native ad body.


Native ad body.