

 Photography & Styling: Geneva Vanderzeil
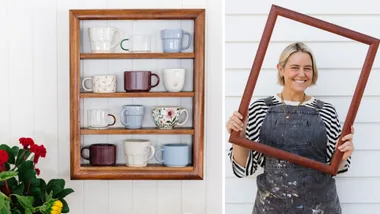
Make the most of your space with this easy build that turns a blank wall into an attractive display space.
These simple shelves have thin vertical dividers which form a grid pattern, perfect for showing off your favourite thrifted finds and knick-knacks.



How to make wooden display shelves

Gather your supplies
- Jigsaw
- Clamps
- SpecRite 1800 x 600 x 18mm timber multi-use pine panel
- 9mm thick plywood or timber
- Sander or 180-grit sandpaper
- Wood stain (Feast Watson or similar)
- Wood glue
- Small timber nails
- Drill
- Clear gloss sealant (Feast Watson Gloss Varnish or similar)
- Heavy-duty mirror or picture hanger brackets (34kg capacity)
You’ll also need
- Carpenter’s square
- Pencil
- Microfibre cloth
- Clean rags or brushes
- Tape measure
- Spirit level
- Hammer
Cutting guide
- 1 x Back panel/base (18mm thick wood) — 792mm x 600mm
- 5 x Shelves (18mm thick wood) — 600mm x 90mm
- 3 x Vertical dividers (9mm thick wood) — 792mm x 21mm
Safety notes
- When operating power tools, cutting and sanding, wear safety glasses, a mask and earmuffs.
- Tie your hair back.
Step 1
Following the cutting guide below, measure, mark and cut all pieces. You’ll have a back panel, five shelves and three vertical dividers.
Sand all wood pieces using 180-grit sandpaper. Remove dust with a microfibre cloth.
Step 2
Apply wood stain evenly with a cloth or brush, following the grain. Wipe off any excess and allow it to dry according to the product instructions. Apply a second coat if needed.

Step 3
Lay the back panel flat and mark out the shelf positions with a pencil. Space them as desired, varying the heights for a more dynamic layout.

Step 4
Glue the horizontal shelves in place onto the back panel, ensuring each shelf is level before gluing.
Step 5
Next, position three vertical dividers on top of the shelves at varied points to create three columns.
Glue in place. Leave to dry overnight.


Step 6
To reinforce the structure, secure all joins with nails from the back.

Step 7
Apply a clear finish, such as a gloss sealant. Allow it to dry fully. Apply a second coat if necessary.
Step 8
To hang the shelves, attach heavy-duty hanger brackets to the back of the unit, then secure them firmly to the wall.

Quick tip
- Clamp wood pieces before cutting or drilling to prevent movement.

