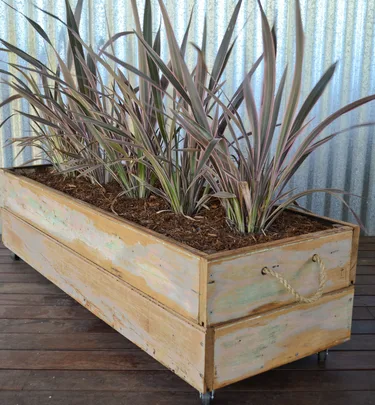
It’s a crying shame to see the amount of timber that goes into landfill, when with a little effort it can be repurposed for a new project. This planter is made of reclaimed tongue and grooved (T&G) lining boards, cleaned up minimally to feature the history found in old timber. Make it more versatile by adding castors, so you can move it into the sun or shade as your plants need.
Gather your supplies:
• Sides (4) 120 x 19 x 700mm recycled T&G timber
• Ends (4) 120 x 19 x 380mm recycled T&G timber
• Cleats (4) 19 x 19 x 205mm timber
• Base(4) 90 x 19 x 680mm recycled T&G timber
• Base cleats (2) 40 x 19 x 360mm timber
You’ll also need:
Angle grinder with flap sander attachment; 45 and 30mm galvanised screws; polyurethane adhesive; 13mm sisal rope; exterior low-sheen clear finish; drill; tape measure; chisel; wooden mallet; castors (optional).
Notes:
1. The T&G timber used here is old 19mm-thick VJ or Regency lining board, probably hoop pine. Softwoods such as pine will rot over time when continually damp, so consider lining inside with plastic and keeping plants in pots, or use hardwood floorboards instead. You can also butt join non-grooved timber to make planter from whatever you have.
2. Size of timbers is not important. Adapt to suit material you have.
Here’s how…
STEP 1
You can achieve lovely rustic effects with previously painted timber, as you work back through layers of paint. Use a flap sander on an angle grinder, but use it gently, as these sanders remove material very quickly and you do not want to remove all old finishes. If you’re using old boards, make sure you wear a dust mask as old paint may contain traces of lead.
STEP 2
Measure out all timber sides and ends, and cut to length.
STEP 3
Predrill for 2 screws in 1 end of a side. Apply polyurethane adhesive sparingly to end of adjacent end piece. Butt 2 pieces together, check they are correctly aligned, then screw together. Keep adding boards to form a rectangle, each time screwing a new board to end of previous board.
STEP 4
T&G boards have a tongue at top and a groove on underside, which allows boards to lock together. For the top edges of the upper boards to be smooth, plane off the tongues. In addition, as 2 layers of boards are staggered at corners, use a chisel to remove 20mm of tongue at each corner so next board can sit down properly on layer below.
STEP 5
Screw top layer of boards together as in the bottom rectangle. Use a wooden mallet to tap timber home if fit is a little tight. Alternatively, a soft piece of pine and a hammer will do the same job. Glue and screw a 19 x 19mm cleat into each corner to hold lower and upper layers together securely. Cleats should star t 30mm up from bottom of box and finish 5mm from top of box.
STEP 6
To form a base, from underside, screw together 4 boards using two 40 x 19mm base cleats. With box upside down, insert base so it settles on bottom of corner cleats. Use wooden mallet to ensure base is sitting down well, then screw in place through sides and ends.
STEP 7
Screw a 50mm castor to bottom of planter in each corner, if you like. This will allow you to move planter around to chase sun in winter, and shade in summer.
STEP 8
With planter still upside down, drill a pair of 13mm diameter holes in each end, about 40mm down from top and 180mm apart for rope handles. While you are at it, also drill 8 drainage holes in bottom of planter.
STEP 9
Feed sisal rope through handle holes from outside and tie a knot on inside so rope cannot pull through.
STEP 10
To protect planter and bring out rich history of colours, paint with an exterior oil or clear finish.
Related stories

Native ad body.
Native ad body.


Native ad body.